When a user wants to add any paragraphs, images, headings, lists, videos, or galleries as content in the embedded Gutenberg Editor, these are considered 'blocks'. These 'blocks' provide a holding space for the specific content that needs to be added. This gives a user the power to build visually appealing web pages, have control over the layout, and craft media-rich pages or posts with minimal to no coding.
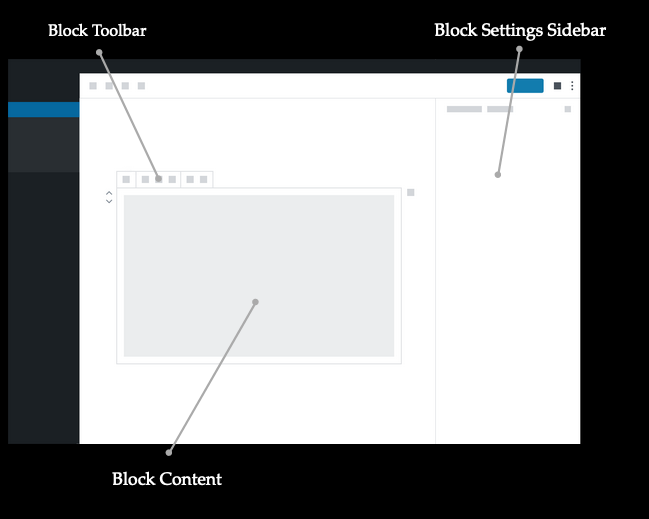
Each block consists of three areas: Block Toolbar, Settings Sidebar, and the Block Content.
There are two ways to add blocks to your post or page.

One method involves using the + button, known as the "Block Inserter", which is accessible from anywhere on the page.

Another method is to utilize the slash command feature, allowing you to swiftly locate the desired block and incorporate it into the page. Just type in "/" followed by the name of the block you want to add.
To customize a block to tailor the layout and appearance of each specific block, you can use the Block Toolbar to configure.

Select a block to reveal the Block Toolbar at the top; it includes the formatting options for the selected block. These options in the Block Toolbar will vary based on the block that is being inserted.
Some of the most common options in the Block Toolbar are as follows:
The "Transform To" option is represented by the far left icon in the toolbar. This allows you to change the selected block into a different supported block type. It provides a quick way to convert one type of block into another, offering flexibility in the content structure of your post or page. This feature is useful for adapting your content without having to recreate it from scratch.
For instance, suppose you add a Paragraph block and wish to convert it to a Quote block, Heading block, List block, or Pullquote block. Clicking this icon will present you with a drop-down menu containing these options for transformation.

The available transform options will depend on the specific block that is selected; the ones shown here are for Paragraph block.
When a block is transformed, the existing block styles are preserved after the block transformation.
When a block is transformed, the additional classes added in the Additional CSS class(es) section under Advanced in the Block Settings sidebar are also preserved after the block transformation.

Click and hold the drag icon to move the block to another section of the page.
Click the up or down arrow to shift the block one position upward or downward on the page.
The three vertical dots open a menu with additional settings to further customize the block.

When you select a block, additional settings can be found in the sidebar to the right of the Kodaris block editor. You can toggle between settings for the entire post or page and settings specific to the selected block.
To show or hide the sidebar settings, click the Settings (cog) icon located at the top right of the editor.
The Page Settings is where you can add tags and categories, choose a featured image, and more — these are settings that apply to the entire post or page.
The Block Settings in the sidebar contains more advanced customization options for the specific block you’re working on. Each block has its own settings that you can explore here. The settings will vary based on the block you are working.
Some of the blocks such as Image, Gallery, Quote, Social icons, Separator, Table, and Buttons have a Styles panel with buttons to show the various display options. Hovering over each of the buttons will show a preview of the style.

Some settings options, like "Typography", have an option to revert back to the original settings. Select the three-dot menu icon and click "Reset All". This resets the settings and removes all of your changes.

No matter what block is selected, the Block Settings will have Advanced section with various options that appear when you click on the down arrow, including:
special or a term made up of multiple words with each word separated by hyphens, such as special-class. You can add multiple classes to the same block by separating each class by a space, for example: special-class-1 special-class-2
To remove a block, select the block and click the "more options" icon in the block toolbar. At the bottom of the menu, you will find the option to remove that block.
You can now select multiple blocks by partially selecting the contents inside the blocks – by shift + click, and also the keyboard (shift + arrow). This is helpful to move or transform multiple blocks at once, to change the Block settings on multiple blocks, group or stack multiple blocks, etc.
You can group together multiple blocks into one group and treat them as a unit. This is helpful to edit, format (such as add a common background color, change the font color, etc.), or move a group of blocks. If you don’t want them to be in a group, you can Ungroup your blocks as well.