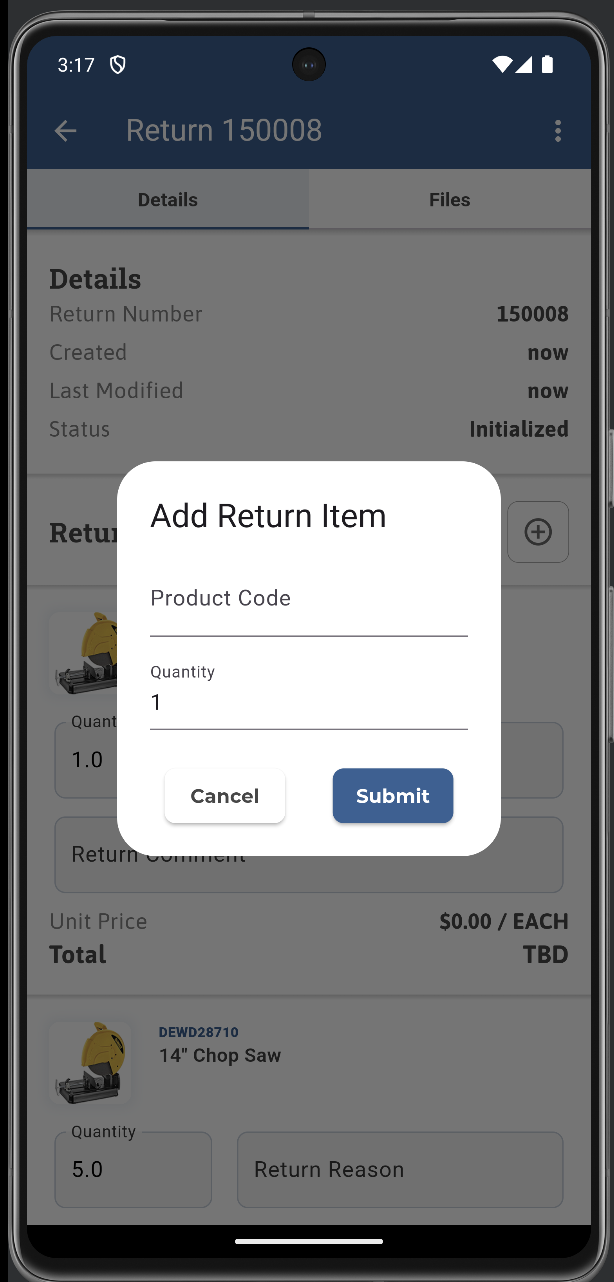
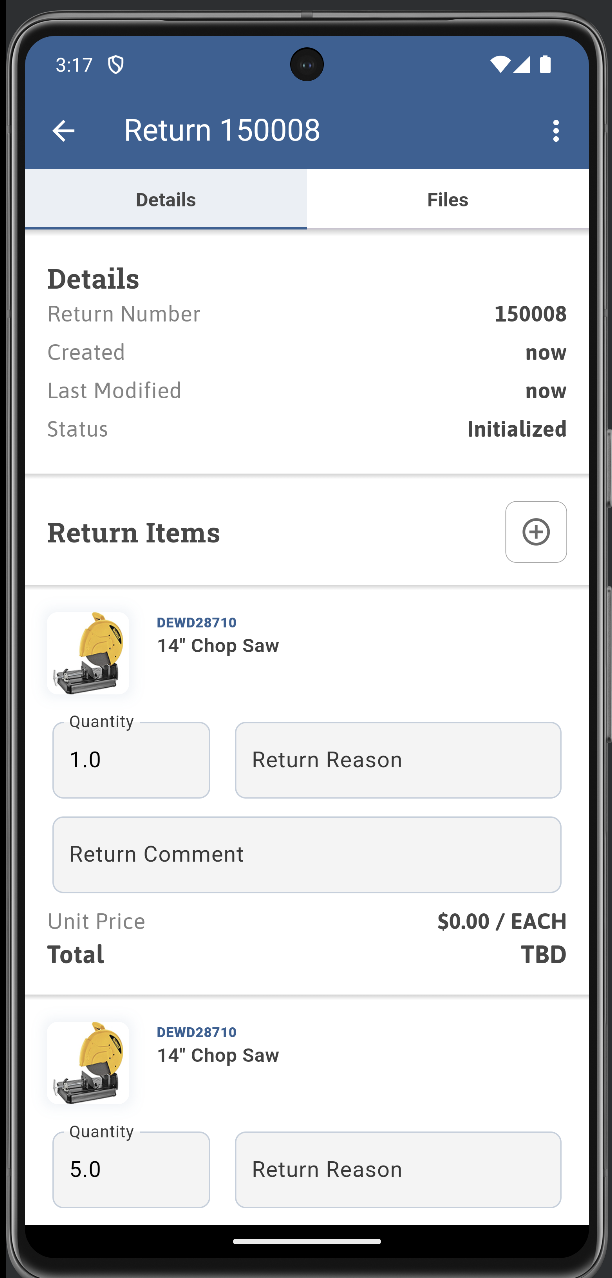
You can now create product returns directly from the mobile app. To start a return, open the three horizontal dots menu, select Returns, and tap the + icon. Enter the product code and quantity to submit the request.
The app also lets you view details of created returns and quickly find a specific one using search. This helps teams track return activity in real time without switching tools.
For additional context, you can upload a picture to a return, supporting clearer documentation and faster follow-up.
Availability: Available in the latest version of the mobile app.
Operations Portal
Company Budget Management Now Available in Operations Portal
Users can now create and manage budgets directly from company detail pages through a streamlined workflow. The new budget creation process is accessible via the "More" dropdown menu and supports configurable parameters including budget type (Total Spend), status tracking (Invoiced/Paid), and custom date ranges. Once created, budgets automatically appear in a dedicated Budgets tab on the company details page.
The feature includes built-in editing capabilities, allowing users to modify budget parameters directly from the budget grid view or through individual budget details. Users can also remove budgets entirely through the grid interface, providing complete budget lifecycle management within the Operations Portal.
View the demonstration video for a complete walkthrough of creating and managing company budgets.
https://youtu.be/0hUTd98F3nI
Tickets
KOD-24897: Customer Mobile App - Add Returns Functionality
KOD-27128: Add Automated Invoice and Statement Delivery documentation to Kodaris.com help pages
KOD-27365: Add server side export to company cross references screen
Regression Tests
Case 1
Go to the Operations Portal.
Navigate to Companies > Company > Cross References.
Confirm that:
The page loads successfully.
All grid data is displayed correctly.
All elements are available for interaction.
Tests
Case 1
Go to the Operations Portal.
Navigate to Companies > Company > Cross References.
On the Cross References page, click File > Export > Save.
Open the downloaded file.
Confirm that:
The file is downloaded successfully.
The data in the file matches the data displayed in the grid.
KOD-27668: Budgets - Add UX for adding company level budgets
Regression Tests
Case 1
Very that the actions and the navbar on a company page still works.
Open the actions menu and test a few actions.
On the navbar try to going into the budget and out of it and navigating between non-budget related items.
The navbar should show the budget when you navigate into it but then hide it back under “more" when you navigate out of the budget.
Tests
Case 1
Validate that when navigating into a company, such as /companies/1669 on the operations portal that the tab navbar has, on the “more" dropdown, the “Budgets" tab.
Click on the Budgets option. The budgets table should open, the address should be /companies/1669/budgets where 1669 is the Company ID.
The tabs should display the Budgets tab, instead of hiding it under the “more" dropdown and the more dropdown must not contain the Budgets option.
Change tabs and validate that the Budgets is unselected and removed form the tabs and goes back into the “More" dropdown.
Case 2
Create the budget for a company. In the companies list in the toolbar click the “more" button and click “add budget".
The name for the budget is arbitrary (for naming the budget) but mandatory, you can rename it to test or leave the default company name.
The Budget type available currently from core config is only “Total Spend" so select it.
The default status/restriction type is “Invoiced, Paid", you can leave either or both so the calculation finds both, if none is left the calculation won’t find any.
The start and end dates define the range.
Before clicking “Add" leave the network tab open on the browser to validate that not only the budget is created but also that the calculate action endpoint is called so the initial calculation is started.
After adding you should be redirected to the budget.
Because budgets can also be added inline on the table try to fill the new line with the new budget information on the budgets list page and hit enter to add it from there without using the add budget dialog.
Case 3
Edit and delete rows on the budgets list table and validate that the rows are edited properly and the table is updated with the latest value.
Case 4
Navigate from the budgets list into the budget detail page. Edit information and validate if the changes are applied (if you want to look at the network tab it should make a PATCH call).
The navigate back to the budgets list to validate that the PATCH works and the edited value is the current value.
Case 5
In this test we want to add “Received" to the budget order type so that it is picked up when a new order is placed even before invoicing and paying.
Also for testing right now we need to manually add the date to Extra3 and the date on Extra3 for the order should be within the budget start and end range.
Take note of the current spend amount for the budget. Place a new order. On the companies order double check the order value, after the next few steps the current spend amount should have the new order value added to it.
In the order go into “more" and “development" and add a date to Extra3, the date should fall between the start and end date for the budget.
Then on the budget click and more and click calculate. After a few moments refresh the page to see if the new current spend amount matches the previous spend amount + the new order after calculating.
KOD-28073: Store Credit Testing / Documentation
KOD-28270: Implementation - Integration
KOD-28617: Create abandoned cart email template
KOD-28974: Configure Freight Charges-Credit Card vs Terms Customers
Regression Tests
Case 1
Verify that the Shipping Methods functionality is working correctly in step 3 of the checkout (displayed according to the methods added in the operation portal).
Verify that the Rates functionality for Shipping Methods is working correctly (displayed according to the rates added in the operation portal). The shipping total includes the shipping cost.
Tests
Case 1
Verify that when the companyCanUseCreditCards setting is enabled in Shipping Methods, rates are displayed in step 3 of the checkout process according to the rates added in the operation portal, and the shipping total includes the shipping cost.
Verify that when the companyCanUseCreditCards setting is disabled in Shipping Methods, rates are not displayed for Shipping Methods, and the order total does not include the shipping cost.
KOD-29010: Order & AP Automation - Development Environment UX
Regression Tests
Case 1
Go to Account Payable → Vendors.
Open a random vendor entity.
Check that the header with navigation looks good, responsive works well and there’s no any issues with it.
Go to Customers → Customers.
Open a random customer entity.
Check that the header with navigation looks good, responsive works well and there’s no any issues with it.
Tests
Case 1
Go to Account Payable → Vendors.
Open a random Vendor entity.
In the entity tabs select the “Automation” tab.
Check that the layout looks good, responsive works well.
Go to Customers → Customers.
Open a random Customer entity.
In the entity tabs select “Automation” tab.
Check that the layout looks good, responsive works well.
Case 2
On the Vendor automation page check, that in the top right corner is a “Create Analysis Script” button.
Click on it and set the next value for script for test to see the results UI:
invoice.vendorName = "TEST_VENDOR_NAME" ;
invoice.invoiceDate = '2023-01-01' ;
invoice.reference = 'PO-998877' ;
invoice.totalAmount = 1110;
invoice.currency = 'USD' ;
invoice.dueDate = '2023-01-02' ;
invoiceItems.add({
description: 'Software License' ,
quantity: 1,
rate: 250,
total: 250
});
invoiceItems.add({
description: 'Consulting Services' ,
quantity: 10,
rate: 100,
total: 1000
});
Save it. Go back to the “Vendor Automation” page.
Try to upload a new file. Check that after file analysis finishes we have the same values in the UI as we set in script.
Go to the script page and try to update some values, for example vendorName and reference . Go back to the “Vendor Automation” page.
Try to click on the “Re-analyze” button right under the document preview block.
After analysis finish check that the values that you changed in the script, also changed in the result after re-analyzing.
Try to click the “Download” button, in the top right corner. You will download the results zip file. Unzip it, check that there’s the same names of files according to “Analysis Methods” selected before analysis started.
In the bottom left corner click on “Upload Document”. Try to upload one more document for a test. Check that after file analyze, the analyze document in the preview is updated.
Case 3
On the “Vendor Automation” page, click on “Update Analysis Script” button. Then go to Revisions. Try to restore to the first revision of the script. Check that the value of the script changed.
Go back to the revisions page and restore to the most recent revision. Check that the script is restored correctly.
Go to The revisions tab, open specific revision.
Check that the code in the revision is read-only. Go to the Detail tab, check that content there rendered correctly.
Try to run “Restore” revision from this point. Check that the script changed correctly after restoring.
Case 4
On the Customer automation page check that in the top right corner is a “Create Analysis Script” button.
Click on it and set the next value for script for test to see the results UI:
order.vendorName = "TEST_VENDOR_NAME" ;
order.invoiceDate = '2023-01-01' ;
order.reference = 'PO-998877' ;
order.totalAmount = 1110;
order.currency = 'USD' ;
order.dueDate = '2023-01-02' ;
orderItems.add({
description: 'Software License' ,
quantity: 1,
rate: 250,
total: 250
});
orderItems.add({
description: 'Consulting Services' ,
quantity: 10,
rate: 100,
total: 1000
});
Save it. Go back to the “Customer Automation” page.
Try to upload a new file. Check that after file analysis finishes we have the same values in the UI as we set in script.
Go to the script page and try to update some values, for example vendorName and reference . Go back to “Customer Automation” page.
Try to click on the “Re-analyze” button right under the document preview block.
After analysis finish check that the values that you changed in the script, also changed in the result after re-analyzing.
Try to click “Download” button, in the top right corner. You will download the results zip file. Unzip it, check that there’s the same names of files according to “Analysis Methods” selected before analysis started.
In the bottom left corner click on the “Upload Document”. Check that initial view opened.
Case 5
On the “Customer Automation” page, click on “Update Analysis Script” button. Then go to Revisions. Try to restore to the first revision of the script. Check that the value of the script changed.
Go back to the revisions page and restore to the most recent revision. Check that the script is restored correctly.
Go to The revisions tab, open specific revision.
Check that the code in the revision is read-only. Go to the Detail tab, check that content there rendered correctly.
Try to run “Restore” revision from this point. Check that the script changed correctly after restoring.
Case 6
Go to the Automation page of Vendor/Customer.
Open the “Network” Tab in the Developer Tools.
Try to change the “Enable Analysis” selected value. Check that in the network */setting request appeared.
Try to change the value of “Enable Analysis” back to the previous value. Check that at this time the /vendorInvoiceDocumentAnalysisEnabled or /customerOrderDocumentAnalysisEnabled request appeared.
Try to do the same with “Analysis methods” select. In the first time we will see /setting request. In the second time it should be /vendorInvoicePdfDocumentAnalysisMethods or */customerOrderPdfDocumentAnalysisMethods request.
After changing these fields try to reload the page and after reload the values of the selects should be the same as before the page reload.
KOD-29064: Update bulk endpoints for adding products to category
KOD-29095: AP- Add Payment Terms Description Next to Code in Vendor Invoice Details
Regression Tests
Case 1
Open an existing vendor invoice with payment terms.
Change payment term to a different value.
Save and reload the invoice.
Clear payment terms field.
Test other invoice operations (update amounts, assignees, status).
Expected Results:
Payment term code and description save/load correctly.
All other vendor invoice fields function normally.
No errors during save/update operations.
Tests
Case 1
Navigate to Vendor Invoices list.
Open any existing Vendor Invoice Details screen.
Locate the "Payment Terms" section in the right sidebar.
Click on the "Terms" autocomplete field.
Observe the dropdown options that appear.
Select a payment term from the dropdown.
Observe the selected value in the input field.
Observe the "Terms Description" section below the input field (if description available).
Expected Results:
Dropdown display: Each option in the dropdown shows both the code and description (if available) in separate columns.
Input field display: After selection, the input field shows only the code.
Description section: Below the input field, a separate section displays "Terms Description" header with the full description text.
If a payment term code has no description, only the code is displayed without error.
KOD-29172: Replatform - Implement CMS section to schedule visibility of content
Regression Tests
Case 1
Confirm that existing CMS blocks continue to render normally (without any errors).
Tests
Case 1
Confirm that the section block can be added to a page and that it renders without any errors.
Confirm that content (text, images, or any other blocks) can be added inside the section block and that it displays correctly on the page.
Confirm that when the start date/time is set in the future , the section block is not displayed on the preview site.
Confirm that when the end date/time is set in the past , the section block is not displayed on the preview site.
Confirm that the section block is displayed correctly when the start date/time is earlier than the current date/time and the end date/time is later than the current date/time.
KOD-29173: Cart Disappearing
KOD-29182: New price discrepancies after updating price engine to v7
KOD-29197: Kodaris - Add new logo to the website
Regression Tests
Case 1
Check that the website footer still looks as normal without issues.
KOD-29199: Adding pagination for /api/system/customerGroup{id}/company/list POST endpoint
KOD-29293: OA: New Customer Parser Setup
KOD-29308: Implement new Order/AP Automation Pattern in Job
KOD-29321: Update Logo for Printed Catalog
Regression Tests
Case 1
Navigate to one of the catalogs → Make sure you can still print out a catalog.
Tests
Case 1
Print out a catalog and notice that the logo is now the distribution one and the color is their primary green color.
KOD-29324: Create Commerce Host
KOD-29326: Page URL structure question - Including parent hierarchy
KOD-29335: Add shipto setting to a company address as soon as it gets pushed to CSD
Verify that order creation with products that have Unit Conversions works correctly.
Verify that the Unit Conversions type is displayed correctly on the search page, in the cart, and in the items tab in the operations portal after creation (unitSell field).
Verify that there are no issues synchronizing with the ERP and that the order is correctly sent to the ERP.
Tests
Case 1
Check that after synchronization with the ERP and receiving data from the ERP, the unitSell values have not changed.
KOD-29353: Parser length fix
KOD-29354: Add Assignees to Content Pages
Regression Tests
Case 1
Confirm that endpoint /api/user/employee/configuration still works.
Tests
Case 1
Confirm setting contentPagesAssignmentTypes exist and can be updated.
Case 2
Update setting in case 1 to have comma separated values.
Confirm that those values are returned from /api/user/employee/configuration endpoint
KOD-29355: Kodaris - Put Order Change System Events on Order System Events Screen
KOD-29363: Automate Parser - Picking up invalid line
KOD-29368: Kodaris Community Show - Episode link issue
Regression Tests
Case 1
Check that the podcasts page still works as expected without issues.
Tests
Case 1
When clicking the ‘Open Episode’ link for any episode, it should take you to that episode, not the latest.
KOD-29373: Confirm getOrderItemHistory endpoint is asynchronous
Tests
Case 1
After clicking Add Item , I select the last product (known to have order history).
Immediately after selection, the focus automatically moves to the Qty input, which triggers the /api/system/order/getOrderItemHistory call by default.
While the API request is in progress, I click a number to change the quantity and the input remains fully responsive. The quantity value is updated immediately, without any delay or blocking.
The history panel appears only after the API response is received, confirming that the endpoint execution does not block user interaction.
Case 2
The product is selected in the Add Product input to load all required product data.
The Qty input is then defocused to reset the state.
With network throttling set to 3G , the /api/system/order/getOrderItemHistory request is triggered by focusing on the Qty input.
While the API request is in progress, interactions with other parts of the page remain fully responsive and are not blocked.
This confirms that the endpoint execution does not block the UI even under slow network conditions.
Case 3
The Add Product field was used to load all required search data.
Network throttling was then switched to 3G , and multiple different products were added rapidly without waiting for previous API responses.
All products were successfully added one by one while the requests were still in progress.
The page remained fully responsive throughout the process, showing only per-item loading behavior and no global UI blocking or errors.
This confirms that rapid item entry is supported even under slow network conditions.
Сase 4
A temporary 1000ms timeout with a 2000ms delay was added to simulate server errors (5xx/timeout).
When the Add Product endpoint was triggered, an error occurred, but the user was still able to continue adding products to the order without interruption.
Focus remained on the input, and the UI stayed fully responsive.
This confirms that error and timeout handling is non-blocking , and the user workflow is not hindered even under slow or failing API conditions.
I used Performance recording in DevTools to see how the browser handled the request and user actions.
Selected a product in the Add Item field to load all necessary information.
Removed focus from the field.
Turned on 3G network throttling in Chrome DevTools.
Focused the quantity input to trigger the getOrderItemHistory endpoint.
While the request was in progress, typed different numbers in the quantity field to check if the page was still responsive.
Result:
The API request took over 4 seconds to complete.
The main thread kept processing typing at the same time.
INP was 23ms, showing immediate response to user interactions.
The page remained fully responsive, allowing the user to continue adding products and interacting with the UI without delays.
KOD-29380: Supersede Product Redirect Space Issue
KOD-29394: Replace /api/system/customerGroup{id}/company/list POST endpoint
Regression Tests
Case 1
Verify that the Company Group screen in the operation portal appears correctly.
Verify that the assignee company functions (add/remove) work correctly.
Verify that there are no errors when navigating to the Company Group screen in the console.
Tests
Case 1
Verify that the /api/system/customerGroup{id}/company/listV2 POST endpoint is called when navigating to the Company Group screen.
Verify that the grid on the Company Group page is paginated (50 items are displayed per page).
Verify that the grid loads quickly with a large number of assignee companies.
Verify that the add/delete functions work quickly with a large number of assignee companies.