Configure Time Limits for Customer Return Requests
The platform now allows users to define a specific timeframe during which customers can request returns through the Customer Portal. This configurable return eligibility period helps you establish clear return policies and automatically enforce them.
To implement this feature, administrators can access the Returns Configuration screen in the Operations Portal and specify the maximum number of days after purchase that an order remains eligible for return. When customers attempt to initiate returns for orders outside this timeframe, the system automatically prevents the action and displays a clear notification message. Setting the value to zero maintains unlimited return eligibility.
This functionality streamlines return management by reducing manual review of outdated return requests while providing customers with transparent expectations about return timeframes.
The return eligibility period feature is now available to all users in the Operations Portal. For a detailed walkthrough of the configuration process, please refer to our instructional video on return period management.
https://youtu.be/8dEMXC5h0gc
Operations Portal
Clone Ticket Groups Feature Now Available
The Clone Ticket Group functionality streamlines the process of duplicating related tickets. To use this feature, first enable the Ticket Group column from the column visibility menu. Then select "Clone Ticket Group" from the Actions dropdown, choose the ticket group you wish to clone, and optionally assign them to a specific company. The system creates duplicates of all tickets in that group, automatically adding "CLONE" to their titles while preserving all other ticket attributes.
This feature saves time when you need to recreate similar ticket sets across projects or departments. Cloned tickets maintain their relationship to one another while allowing you to make any necessary adjustments to the duplicates as needed.
This feature is now available to all Operations Portal users. For a step-by-step demonstration, please refer to our instructional video on using the Clone Ticket Group function.
https://youtu.be/ciC1PmYLqYQ
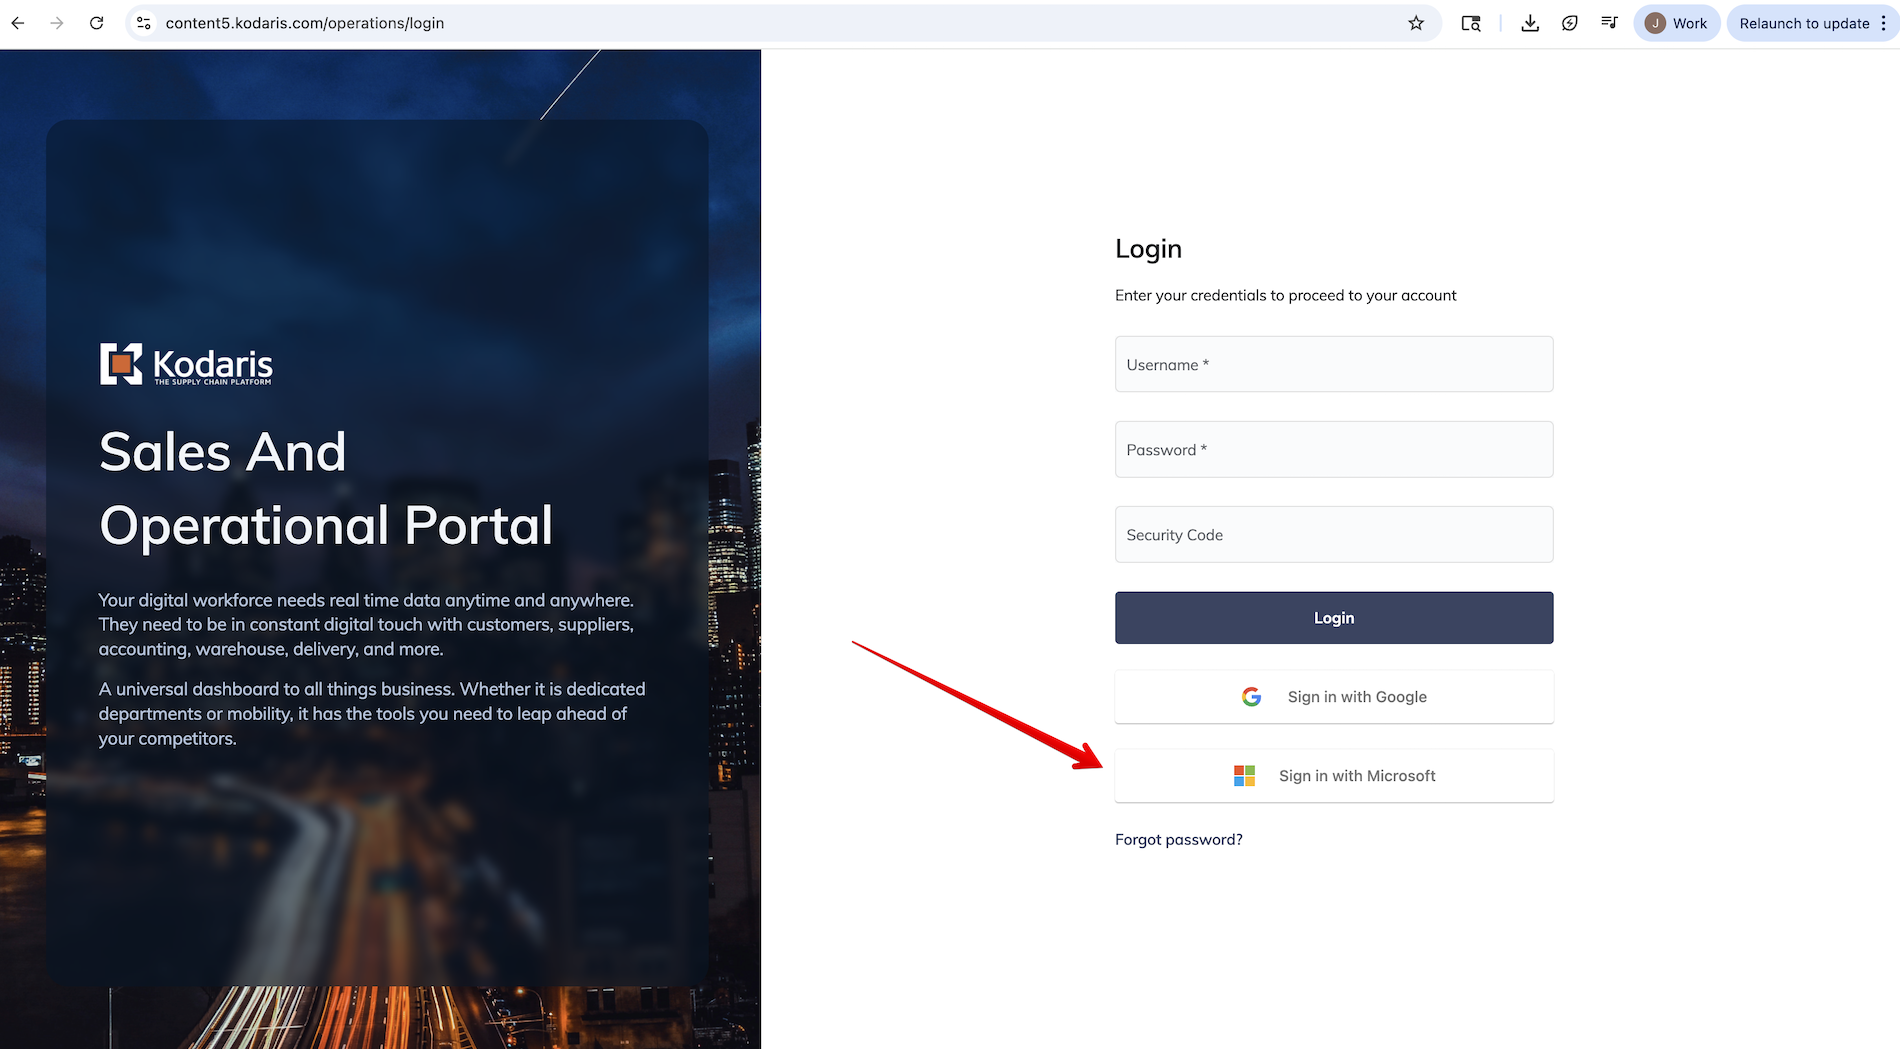
Microsoft Single Sign On
In this release, we've also added Microsoft Single Sign On. If you or your organization uses Microsoft tools, you can simply navigate to the login page of the operations portal and choose "Sign in with Microsoft". If you are already signed in to your Microsoft account you will be automatically signed in to your Kodaris operations portal as well. If you are not signed in to Microsoft, you will be prompted to do so before being automatically signed in to Kodaris.
Tickets
KOD-24941: Configurator - Add Data to Automated Price Book Download and Website
KOD-25126: Update Freight options and verbiage at checkout
Regression Tests
Case 1
Open the website.
Add a product to the cart.
Proceed to checkout and select a non-UPS shipping method.
Place the order.
Expected result: The order is successfully created.
Tests
Case 1
Open the website.
Add a product to the cart.
Proceed to checkout and select UPS shipping.
Check for the message “Freight will be added after invoicing.“
Enter UPS account number.
Verify stored UPS account number in the Operations Portal.
Copy the OrderID.
Navigate to the Operations Portal → Orders, find the corresponding order.
Expected result: The user1 field is present and displays the entered value.
Verify updates are reflected.
Change the user1 in the checkout input field.
Refresh or recheck the order in the Operations Portal.
Expected result: The value is updated in both the website and the Operations Portal.
Verify user can switch from UPS to another method.
On the checkout page, select UPS first, then switch to a different shipping method.
Expected result: The UPS Account Number field becomes not required when UPS is not selected. The user can successfully place the order without entering an account number.
Repeat the test on a mobile device.
KOD-25463: Master order/budgets - Add function for quoting codes in budget calculation and more
Regression Tests
Case 1
When calculating a budget from a Budget (Company address) which was not created off of the quote, there should be no the total amount should be calculated correctly without any duplicated value and no errors.
Go to the company address from a Company.
Add a budget from here:
Add some items from the customer side and then create an order using those items.
The total amount will be for all the orders that used that address and are in status Invoiced, Paid (you can modify that if needed when creating the budget) and has the items that the budget has.
Make sure the total amount corresponds to the items and there is no error.
Tests
Case 1
Generate a Quote and assign required fields to set up a location (endDate, type, locationName, address fields).
Assign some items to the quote. Make sure we have at least the following items:
At least one quote code item (product which is technically display = false and has user4 value populated with 0,1 or 2).
At least one product that is note a quote code (any product that can be bought in the commerce site).
Make sure those items have a quotingPriceType assigned. In order to have the price type assigned we need the skus with priceType populated and that will be copied into the Items.
In the quote should appear then:
Then, set up the quote location and generate the budget after that.
Expected result:
The company budget items should contain the new quoteCode = TRUE and pricingType field populated for those items which are quote codes.
Case 2
As we did in the regression test, we have to do the same step here:
With the existing companyBudget with some quoteCodes on it, add new items from the customer side and make sure those are appearing with ‘quoteCode’ = false.
Then, create an order using this new address and add the items you included in the budget from the customer side.
Validate that the orderItems created for the Order has the ‘priceType’ populated (In case 1 we have validated that some real codes added to the quote should have priceType so at this point the items should contain that priceType as well)
After that, move the Order to ‘Invoiced’ so it can be picked up from budget calculation.
If any of the items added to the order has the same priceType than the ‘quoteCode’, then the budget line items added when generating the budget off of the quote will be updated with total spend amount.
Make sure the total budget amount is still correct and it is not counting the quoteCode = true budget lines.
Make sure those budget line items have the current spend amount per line (Notice that the current spend amount is included in those lines but they are not counting in the total for the parent budget)
Make sure that for each budget line, the product quantity now is the ‘quantity shipped’ instead of the quantity.
In this case, there were no shipped items so all of them are 0, but in the video I showed an example with quantity Shipped > 0.
KOD-25895: Registration Form Enhancement
Regression Tests
Case 1
Navigate to the website → Register page.
Fill in the registration form without companyName.
Enter valid data into all required fields except companyName.
Submit form.
Expected result: Registration form is submitted successfully, and confirmation is shown.
Consumer Company has been created in the Operations Portal and an Activation email sent to the user.
Tests
Case 1
Navigate to the website → Register page.
Fill in the registration form.
Enter valid data into all fields.
Submit form.
Expected result: Registration form is submitted successfully, and confirmation is shown.
Go to the Operations Portal and check the created company. The extra data (company name, is existing customer, and customer id/rep) should be added in the notes field.
KOD-26238: Site Update
KOD-26241: Site Update 2
KOD-26870: OS endpoint for indexing documents in bulk.
Tests
Case 1
Every time an order is indexed, we should see a setting: openSearchLastIndexed in the order with the current date (Date after it was indexed).
Every time an order fails, we should see a setting openSearchLastFailedIndex with the current date (Date after it failed).
If the order already contains the setting openSearchLastIndexed we have to make sure the setting is only updated with a newer Date and no errors at all.
We can index an order using the following endpoint in swagger:
api/system/opensearch/order/index/{orderID}
After the order is indexed, we have to make sure the order and the items were successfully created in Open Search.
We have some endpoints to run search queries to filter items by orderID for example:
/api/system/opensearch/orderitem/search
{
"query": {
"term": {
"orderID": 513
}
}
}
Note: In case 2, we will test changes to the index from the OpenSearchIndexerJob in the Scheduler screen.
KOD-26932: List of Translations needed
KOD-27023: Product Configurator - Link variant products to the configurator page not the variant page
Regression Tests
Case 1
Clicking on any product in the commerce site should continue working as expected.
Also, clicking on a ‘Configurator’ product should be the same as clicking on any product.. this means, it should show up the details and everything.
KOD-27257: Turn on Search Debugger tool
Regression Tests
Case 1
As logged in and not logged in users make sure category, search grid/list/catalog and product detail pages are not broken.
Case 2
Log into the operations portal as an employee with the searchDebug role.
Go to the store page. In the search bar type some characters. You can use “steel“ string for search or “123“
Make sure there are some search results on the page.
Make sure the search page is not broken.
Make sure at the bottom of each product tile you see Search Score : and Inspect clickable link.
Make sure when you click on the Inspect link, the Search Inspector Panel is opened. It should contain 3 tabs with info.
Tests
Case 1
With setup from regression case 2:
Make sure at the bottom of each product tile next to the Search Score, the actual search score number is displayed.
Click on inspect on a product.
Go to the Explain Tab.
Make sure in this tab the very first number is the same number which is used to display the Score on the product.
Case 2
Now, we will test the actions button.
“Open product in the operations portal” should open a new tab where you will see the product details screen.
“Open search tools” should take you to the search screen in the ops portal in a new tab as well.
“Open search documentation” should take you to this link .
Case 3
Now log into the commerce site → search for a product → notice you do not see the search score/inspector anymore.
KOD-27337: Environmental Compliance Ticketing System Integration - Next steps
KOD-27342: Clone Tickets Based on Ticket Group - UX
Regression Tests
Case 1
Go to Services → Tickets.
In the header click on the “Actions” button.
Try to open the “Log time” modal and “Add Ticket” modal.
Check that everything is opening correctly.
Case 2
Go to Services → Ticket Templates.
In the header click on the “Actions” button.
Try to open the “Add Ticket Template” modal.
Check that everything is opening correctly.
Tests
Case 1
Go to Services → Tickets.
In the “Actions” dropdown click on “Clone Ticket Group”.
Check that the modal renders correctly.
Open Network tab in the Developer Tools.
Select a specific Ticket Group that you want to clone.
Click submit.
See the clone request in the network tab with the new ticket ids in the response.
Try to reload the page and check these new tickets.
Try to do the same but also with selecting the company that should be assigned to the tickets.
Case 2
Go to Services → Ticket Templates.
In “Actions” dropdown click on “Clone Ticket Templates Group”.
Check that the modal renders correctly.
Open Network tab in the Developer Tools.
Select a specific Group that you want to clone.
Click submit.
See the clone request in the network tab with the new ticket ids in the response.
Try to go to the Tickets page and check these new tickets. Also these tickets have the right ticket type.
Try to do the same but also with selecting the company that should be assigned to the tickets.
KOD-27522: Parser requested update from Ticket 33332
KOD-27531: Shipment Notifications
KOD-27617: PIM Integration for Commerce
KOD-27650: Add Time to Date picker
Regression Tests
Case 1
Open the operations portal. Go to any screen with the Data grid and have a date-time filter enabled. Check if the filter works fine.
Case 2
Go to CMS/Pages. Check if the data screen looks as expected.
Case 3
Go to any Page detail screen. Check if it is displayed as expected.
Tests
Case 1
Go to the data tab for records on CMS/Pages. Find columns for start date and end date. Check if you can enter date and time for them as shown on video.
Check if the date was saved.
Case 2
Go to details screen for any Page. Find fields for start date and end date on the right. Check if you can enter date and time for them as shown on video.
Check if date was saved.
Case 3
Open page editor. Here on the right menubar you need to find a section for Schedule. Here try to update and set date and time for startDate and endDate.
Expected to update data for the page.
KOD-27664: Pull Vendor Code
KOD-27771: Update payment history screen
Regression Tests
Case 1
In the customer portal, (make sure you have accountsPayable role) → make sure you can still click on payment history as well as can click into a payment.
Tests
Case 1
If a payment has a receipt, the payment history details section will now show the receipt on the page with the ability to print the receipt.
As well as below the receipt, you will see the applied invoices to that payment with the header of Paid Invoices.
If no applied invoices are associated with that payment, then you won’t see anything below the receipt.
Case 2
If a payment does not have a receipt, make sure it looks the same as before (date, company, account type, card/bank type, number, amount paid with the applied invoices below), but this time it has the header of Payment Receipt.
KOD-27809: Employee Login/SSO
KOD-27829: Add Wizard link to Customer Portal
KOD-27867: Incorrect backorder suffix and qty selection Created From Ticket 35736
KOD-27960: Microsoft Outlook Integration
KOD-27972: COD Payment Flow issue
KOD-28025: Shipping Methods / Shipvias
KOD-28068: Add Fraud tab to UX on quotes screen in the operations portal
Regression Tests
Case 1
Verify order fraud tab displays with a risk status badge correctly.
Tests
Case 1
Verify Frauds tab appears between Items and Comments tabs with risk status badge .
Case 2
Confirm fraud detail shows Quote Request label and links to quote request page.
Case 3
Verify deprecated checkout block options ( COD Payment and Customer Login ) are removed.
Case 4
Test accessing quote request fraud details from main fraud listing page.
Case 5
Test quote requests without fraud data.
KOD-28092: Changes to invoices
KOD-28112: Implementation - Taxes
KOD-28114: Open Invoice Download Format Created From Ticket 37389
Regression Tests
Case 1
Verify that order and invoice PDF generation is working correctly.
Verify that order and invoice PDFs look correct and that the templates have no UI issues.
Tests
Case 1
Check that the order and invoice PDFs are identical.
Check that the template contains styles and looks similar to the screenshot.
KOD-28115: Add Line Borders to Invoices Created From Ticket 37395
Regression Tests
Case 1
Check that after creating an order, the order information is displayed correctly and the PDF looks correct.
Check that after creating an order, the order information is displayed correctly and the email looks correct.
Tests
Case 1
Check that the PDF with order data has a border in the part of the table where the order products are listed.
Check that the Email with order data has a border in the part of the table where the order products are listed.
KOD-28116: Employee Added Email not Sending Created From Ticket 37402
Regression Tests
Case 1
Verify that Employee creation for the customer is working correctly.
Verify that there are no errors in the console when creating an Employee.
Verify that an "Account Activation" message is sent to your email after creating the Employee.
Tests
Case 1
Verify that after creating an Employee, a message similar to "New User Added to Your Account" is sent to your email address.
Verify that the template is functional and looks correct.
KOD-28143: Check Messaging
KOD-28149: COD Payments Created From Ticket 36913
KOD-28153: Google crawling more products than on each host site
KOD-28177: Parser from Ticket 37817
KOD-28189: AP: Convert "Label 1" to Freight Charges
KOD-28195: Updates to Model Lookup
Regression Tests
Case 1
Navigate to /spcu/lookup by searching for a valid model number.
Verify that the integration loads properly.
Go to a valid product.
Click View Details.
Confirm the product panel displays correct information.
Test Add to Cart to ensure the cart integration works.
Tests
Case 1
Log in with a customer account.
Search for a valid model number.
Go to a valid product.
Click View Details.
Verify the panel displays the correct details and that the price appears as Your Price.
Case 2
Log in with a customer account.
Search for a valid model number.
Go to a valid product with retail price information.
Click View Details.
Verify the retail price matches the product detail screen.
Case 3
Log in with a customer account.
Search for a valid model number.
Go to a valid product with retail and dealer pricing.
Click View Details.
Verify the retail and dealer prices load correctly.
KOD-28199: Additional Homepage Top Brands Widget, and customize slider title
Regression Tests
Case 1
Go to the platform.
Make sure all parts are displayed correctly — header, category list, home page tiles, slider, and footer are in their original places.
Scroll down to the slider section.
Verify that the slider works correctly:
Use the navigation buttons to switch slides.
Click on any slide — it should redirect you to the corresponding product page.
Case 2
Go to the platform with the Customizer.
Choose the “Top Brand” section.
Change some data (e.g., title, image, or link).
Click “Publish” .
Go back to the platform page and confirm that:
The changes are visible.
The slider continues to work correctly.
Clicking on a slide still opens the product page.
Try to delete some slides — they should disappear from the slider after publishing.
Try to add a new slide — it should appear on the platform page, and clicking it should open the linked product page.
Tests
Case 1
Go to the platform page again.
Scroll to the slider and confirm that the title has changed, but the content remains the same as before.
Case 2
Open the Customizer and locate the new element “Refrigeration Equipment Brands”.
Click on it to open.
Click “Add Tile” .
Choose a new photo from the media list.
Add a title and URL , then click “Publish” .
Go back to the platform page — a new slider should now appear with your slide.
Case 3
In the Customizer, click to add a new slide.
Drop a photo into the field.
Add a URL and title , then publish .
Check that the new slide appears on the page.
Case 4
Go to the Media Library .
You will see all previously uploaded and used photos available there.
Choose a photo from the library to add.
Click “Choose Tile Image” .
Add a URL and title , then click “Publish” .
Check that the new slide appears on the page.
Case 5
Add several more slides (minimum 5) to check proper navigation.
Confirm that clicking on each slide opens its product page.
Click the navigation arrows (next/previous) to make sure the slider switches slides correctly in both directions.
Case 6
In the Customizer, click the red cross (×) on the tile you want to remove.
Click “Publish” .
Сonfirm that the deleted slide has disappeared from the slider.
Case 7
Go to the platform page without the Customizer .
Verify that all the previously made changes are visible — added, updated, or deleted slides are displayed correctly, and the slider continues to work as expected.
KOD-28205: Pricing on customers not in the "customer type" group Created From Ticket 37882
KOD-28232: Update homepage to CMS page
Regression Tests
Case 1
Confirm that the homepage loads without any issues.
Confirm that we can navigate through categories in the site menu.
Case 2
Confirm that the homepage displays correctly on a mobile device.
Case 3
Confirm that the left panel and the grid with columns have the same height.
Tests
Case 1
Confirm that if we select the “Page with category menu” template in the CMS, the category menu appears on the left, the first block of the page is positioned next to it, and all subsequent blocks start on a new line.
Case 2
Confirm that on the homepage we can see the Top Categories and Top Brands sliders with the elements configured in the customizer.
KOD-28252: Implementation - Addons
KOD-28253: Email Configuration
KOD-28267: Order Automation-Duplicate Order Created From Ticket 38589
KOD-28283: Pricing
KOD-28285: Service API showing double payment in the operations portal
Regression Tests
Case 1
On an order that has a web refund, make sure that it is still showing up properly (under refunds on the payments section of the order details)
Tests
Case 1
For an order with an ERP Credit, make sure that value is populating under the refunds on the payments section of the order.
KOD-28288: Improvements to FAQs Management and Display
Regression Tests
Case 1
Open CMS → FAQs.
See the new column in the search tab with the name “Status”.
Check that it’s rendering correctly.
Go to the “Data” tab.
Try to change the “Status” field in some rows. Check that the changes are updated correctly.
Go to the Specific FAQ item page. See the new “Status” field there.
Try to change it and see the changes stored on the BE.
Case 2
Go to the Operations Portal CMS → FAQs.
Create more than 50 and fill them with the random content.
Go to the public FAQ page.
Open network tab in the developer tools.
Reload the page and in the contentPage request see that we loaded 50 items.
Scroll down to the “Read More” button. Click on it and in the next contentPage request see that we downloaded the rest of FAQs.
Case 3
Go to CMS → FAQ Drafts.
Create a draft, set a random name to it.
Go back to the FAQ Drafts page, see that the draft was created.
Go to Page Drafts page.
Try to find this FAQ Draft on this page by searching by name. See that the draft doesn’t appear.
Tests
Case 1
Go to CMS → FAQ Drafts.
Try to click on the “Add Draft” item.
Check that it was created in the FAQ Drafts table.
Try to delete it by selecting it in the table, then go to the Edit tab in the header and select “Delete selected rows”.
See that the item was deleted correctly.
Case 2
Try to create a new FAQ Draft.
Go to the FAQ Drafts page. See that the draft was created properly.
Go to the draft page and click on the “Publish Draft” button in the header.
See that the draft was published and you were redirected to the FAQ item page that was drafted previously.
Check that this draft disappeared from the FAQ drafts page.
Case 3
Go to the FAQ Drafts page.
Create a few drafts.
Then go to the FAQ Drafts page again.
Try to edit some fields of the created drafts in the table.
See that the changes are saved properly.
Case 4
Login to Kodaris Test Website.
Set the right branch to test on the services page.
Go to the FAQ page.
Go to the Operation FAQ Page.
Add two FAQs, one with title “Untitled” and add some content, second one with changed title to “Title 12” for example, and empty content.
Wait a few seconds until these two items will not appear in the operations FAQ table.
Go to the public page, reload it and see that these FAQs didn’t appear.
Go to operations page, change “Untitled” item title to the different name and set random content for the item with title “Title 12”.
Wait for a few seconds.
Go to the public FAQ page, reload it, and see that these items appeared on the FAQ page.
Case 5
Go to the Public FAQs page.
Open Network tab in the Developer Tools.
Reload the page and check the “contentPage” request.
In the “payload” tab of the request see that “size” prop equals 50.
Check that we have a divider line between FAQ items. Check that it renders properly.
Case 6
Go to the operations FAQ page.
Change “Active” status of all FAQs to “No”. Wait for a few seconds.
Go to the public FAQ page, reload it and see the new empty state text.
Case 7
On the public FAQ page try to input some tests in the search input.
Check that after typing see that the loader appears on some time in the right side of the input.
KOD-28290: Partial Model Search
KOD-28292: Update to product cross references for AP automation
Check that the grid on the Vendor Invoices -> Items page looks correct.
Check that there are no errors in the console.
Check that the layout of the Vendor Invoices page looks good, namely in the items tab.
Check that if the Item has no Vendor Code, a modal with the text - This item doesn't have a valid vendor code is shown.
Check that if the Item has a Vendor Code, a modal with the creation of - Create Cross Reference is shown.
Create Cross Reference and make sure that it has been created in Cross References.
Check that if the Item has a Vendor Code and has been created, Cross Reference is shown - the Update Cross Reference modal opens.
Make sure that the value is updated in the Cross Reference tab.
Tests
Case 1
Verify that the "Pricing Unit Conversion" field has been added to the Create/Update Cross Reference pages.
Verify that the "Divide Unit Conversion" option has been added to the Create/Update Cross Reference pages.
Verify that the field and option are working correctly.
Check that the 2 new fields are displayed in the filter for Items.
Check that the fields on the cross-reference details page look good.
Check on Vendor Invoices/Items tab that when you click on 3 dots for record, dialog windows contain these fields and they work, Conversion Method is a dropdown of Divide and Multiply.
KOD-28306: Parser from Ticket 38804
KOD-28307: Add "Remember Me" Status for Session Expiry Handling
KOD-28319: Clear-all Button for Product Filter
Regression Tests
Case 1
Please check that the category screen still looks good for all three views.
Tests
Case 1
On the category screen choose several filters. Check that you can see on top of the page chosen filters. You also can delete them.
KOD-28320: Logo formatting on emails
Regression Tests
Case 1
Check that the order emails are still sent and look good on Gmail.
Tests
Case 1
Check that order emails still look good on outlook.
KOD-28321: Add delivery details to the return start API
KOD-28325: Content - COD Payment Form Updates
Regression Tests
Case 1
Check that the form layout looks good.
No errors in the console.
Form submission works correctly.
Tests
Case 1
Check that the amount field does not contain any special characters or commas, only numbers and a period; two characters can be entered after the period.
KOD-28333: Purchase Order Character Limit
Regression Tests
Case 1
For this regression test, we will go to the commerce site and follow the checkout process.
Make sure nothing breaks when reloading the screen with the purchase order field filled or empty.
Tests
Case 1
For this test, we will go to the commerce site and follow the checkout process.
The Purchase Order field should be a character limit of 22.
KOD-28334: Enable the payment history screen feature
Tests
Case 1
For this test, a customer with the accountsPayable role should log into the customer portal.
They should be able to access the Payment History screen.
KOD-28336: Allow View Details from System Events Payment Details
Regression Tests
Case 1
Navigate to the Accounts Receivable page.
To make sure everything works correctly, we should go to the Data section.
Add the Payment ID column and search for the event by ID 1176 (this event has some details).
After that, go to the Detail page.
In the top bar, choose System Events — this will take us to the System Events page.
There, we can see that the grid contains some data from this event. We can add or hide new columns, view more details, or download the file.
Tests
Case 1
Go to the System Events page by payment ID 1176, as in the previous test.
By clicking on the arrow to view more details, we are redirected to the Details page.
There, we can switch between tabs — for example, to Custom Fields or Development .
It’s also possible to modify some data in the fields if needed.
KOD-28337: The freight charge are not being tendering
KOD-28347: Prevent return for old orders update to config screen
Regression Tests
Case 1
Make sure that all of the previous functionality on the “Returns Configuration“ screen is intact an works as expected (users can add/ remove return reasons and enable/ disable the customer returns).
Tests
Case 1
On that same screen there should now be a control to update the following setting - “disableReturnOrdersOlderThanDays“.
KOD-28350: Implementation - News Issue
KOD-28351: Check Syncs
KOD-28353: Removed committedDeliveryDate field on Order, rename committedDeliveryDate to promiseDate on orderItem
Regression Tests
Case 1
Using enableCustomerDeliveryDatePerLineFeature system setting, send a deliveryDate when editing a Cart Order Item. UX is supposed to add that feature in the cart for the user to be able to pick a delivery date on the item. If the setting is enabled then the date should be saved in Custom Fields, if it’s not enabled then the date should be ignored.
KOD-28354: Add Sign In with Microsoft button to Operations Portal
KOD-28355: Parser update customer Created From Ticket 35399
KOD-28356: Parser from Ticket 39079
KOD-28359: Update CSD sync and logic to the base for rebates
KOD-28360: Pricing Issue Created From Ticket 34932
KOD-28362: Change the background color of the alert bar
Regression Tests
Case 1
Confirm that the site loaded without errors and that the header is displayed correctly.
Tests
Case 1
Confirm that the background color of the alert bar is #3eafe2 (blue).
KOD-28370: Model lookup functionality where superseded products are not displaying correctly
Regression Tests
Case 1
Navigate to /spcu/lookup by searching for a valid model number.
Verify that the PartStream integration loads properly.
Go to a valid product.
Click View Details.
Confirm the product panel displays correct information.
Test Add to Cart to ensure the cart integration works.
Tests
Case 1
Search for a valid model number.
Find a product without inventory that has been superseded.
Click View Details.
Verify the panel opens showing the superseding product with inventory instead.
KOD-28373: Parser issue from Ticket 30429
KOD-28372: Footer copyright copy
Regression Tests
Case 1
We can see that the page is loaded without errors and the footer is also loaded and correctly displayed.
Tests
Case 1
Going to the footer, we can see that the copyright icon in the footer is displayed correctly.
KOD-28376: Parser From Ticket 39369
KOD-28377: Add setting for custom pages in customer portal
Regression Tests
Case 1
Check that the customer portal still loads without issues.
KOD-28381: Extend business event list response
KOD-28388: Customer Feedback Form
Tests
Case 1
Navigate to the Home page.
Confirm that in the top-right corner there is a “Send Feedback” button.
Click the button and confirm that the Feedback Form opens.
Submit the form without entering any data.
Confirm that all fields are required , except for the “Notes” field.
Fill in all required fields and click the Submit button.
Confirm that a new tab with a “Thank you” message appears.
Verify that our data was sent successfully and that a new ticket and email were created in the Operations Portal .
Confirm that the data matches the submitted form, except for the missing Reporter and Creator names — this is the correct behavior.
Case 2
Navigate to the Product Details page and confirm that there are no changes for guests .
Case 3
Log in to the application.
Navigate to the Home page.
Open the Feedback Form , fill in all fields, and submit.
Confirm that a new ticket and email were created in the Operations Portal , containing the submitted information.
Verify that now both Reporter and Creator fields are filled in.
Case 4
Log in to the application.
Go to the Product Details page .
Confirm there is a “Send Feedback” button next to the “Add to Cart” button.
Click the button, then try to submit the form without entering text — confirm that the text field is required.
Enter text and submit the form.
Confirm that a new “Thank you” window appears.
Go to the Operations Portal and confirm that the ticket and email were created with the correct submitted data.
Case 5
Open the Feedback Form.
Open DevTools → Network tab and change the network speed to 3G .
Fill in the fields and click Submit .
Confirm that a loader is displayed on the Submit button during the loading process.
Change the network status to Offline mode .
Confirm that an error message is displayed after.
KOD-28390: Update Base Mappings to Handle Null Fields from Infor CSD - Pricing End Date Issue
KOD-28421: French logos
KOD-28428: FAQ Update
KOD-28429: Create a global setting to enable editing of orders pushed to CSD
Regression Tests
Case 1
Check the new setting: allowEmployeesToEditErpOrders, should turn off.
Create some order on the operations portal → check field: extra5 if current field empty → on the order details page should return field: canEdit = true.
Then try to fill the field: extra5.
Then call again order details page.
The second steps pls turn on the new setting: allowEmployeesToEditErpOrders
Should return true independent whether field: extra5 empty or filled.
KOD-28440: UX Bubble Counter on Vendor/Internal Comments tabs on Vendor Invoices
Tests
Case 1
Go to Accounts Payable → Vendor Invoices.
Open Vendor Invoice → Internal comments.
Try to Add some comments and check that the counter in the header works well.