Your Kodaris platform includes a simple and easy way to track issues, requests, and project todos with the Tickets section of the Services module. This feature allows you to add information about the items, priority level, start and end dates, and much more.
With this latest enhancement, you now have the ability to expand the ticket description area to fill the screen. This is particularly useful if you would like more room to view and edit ticket descriptions when managing tickets. To use this feature, simply navigate to the Section >Tickets screen, open the ticket you would like to edit, and click on the three dots in the description editor. Select the full-screen option to have the description field fill the screen; when you're done, click the full-screen option again to return to the Tickets screen to view all the ticket information.
Filter or sort products by "extra" fields
The Kodaris platform has built-in five additional fields, labeled as "Extra" followed by a 1, 2, 3, 4 or 5, that can store any data you like in them and can be used for product configuration or other purposes. As an employee, you can now view, sort and filter the Extra fields on the Product > Search screen as well as on the Product > Data screen.
To view these fields, navigate to the PIM section of the platform, select Products, and then choose either the Search or Product tab. Using the Show/Hide Columns icon, choose the Extra fields you would like to display from the menu.
Add roles to customers via import
As part of managing your customers and their Customer Portal accounts, you can now update or add roles to customers via import, as well as mass import a list of customers along with their roles. This is especially helpful when setting up multiple new customers within the Kodaris system at one time.
To use this feature, ensure the file you are importing has a 'roles' column that contains the customer roles you would like added - e.g. companyAdmin or accountsPayable. After creating your file, navigate to the Customers section of the platform, select Customers, and then select the Data tab. On the following screen, select File and choose your preferred Import option. After importing, you should get an email confirming success or notifying you of the failure of your import.
Note: for a successful import, make sure the spelling of the customer roles you are adding match the spelling of the Kodaris roles exactly.
Commerce
Display subcategory slider on category page
Your Kodaris platform includes a robust Content Management System (CMS) that empowers you to build and manage the content on your website. As an enhancement to the CMS that positively impacts your customers' shopping experience, you now have the option to display a slider on a primary category page which showcases the different subcategories within that parent category. This allows customers to visually choose from the subcategories shown.
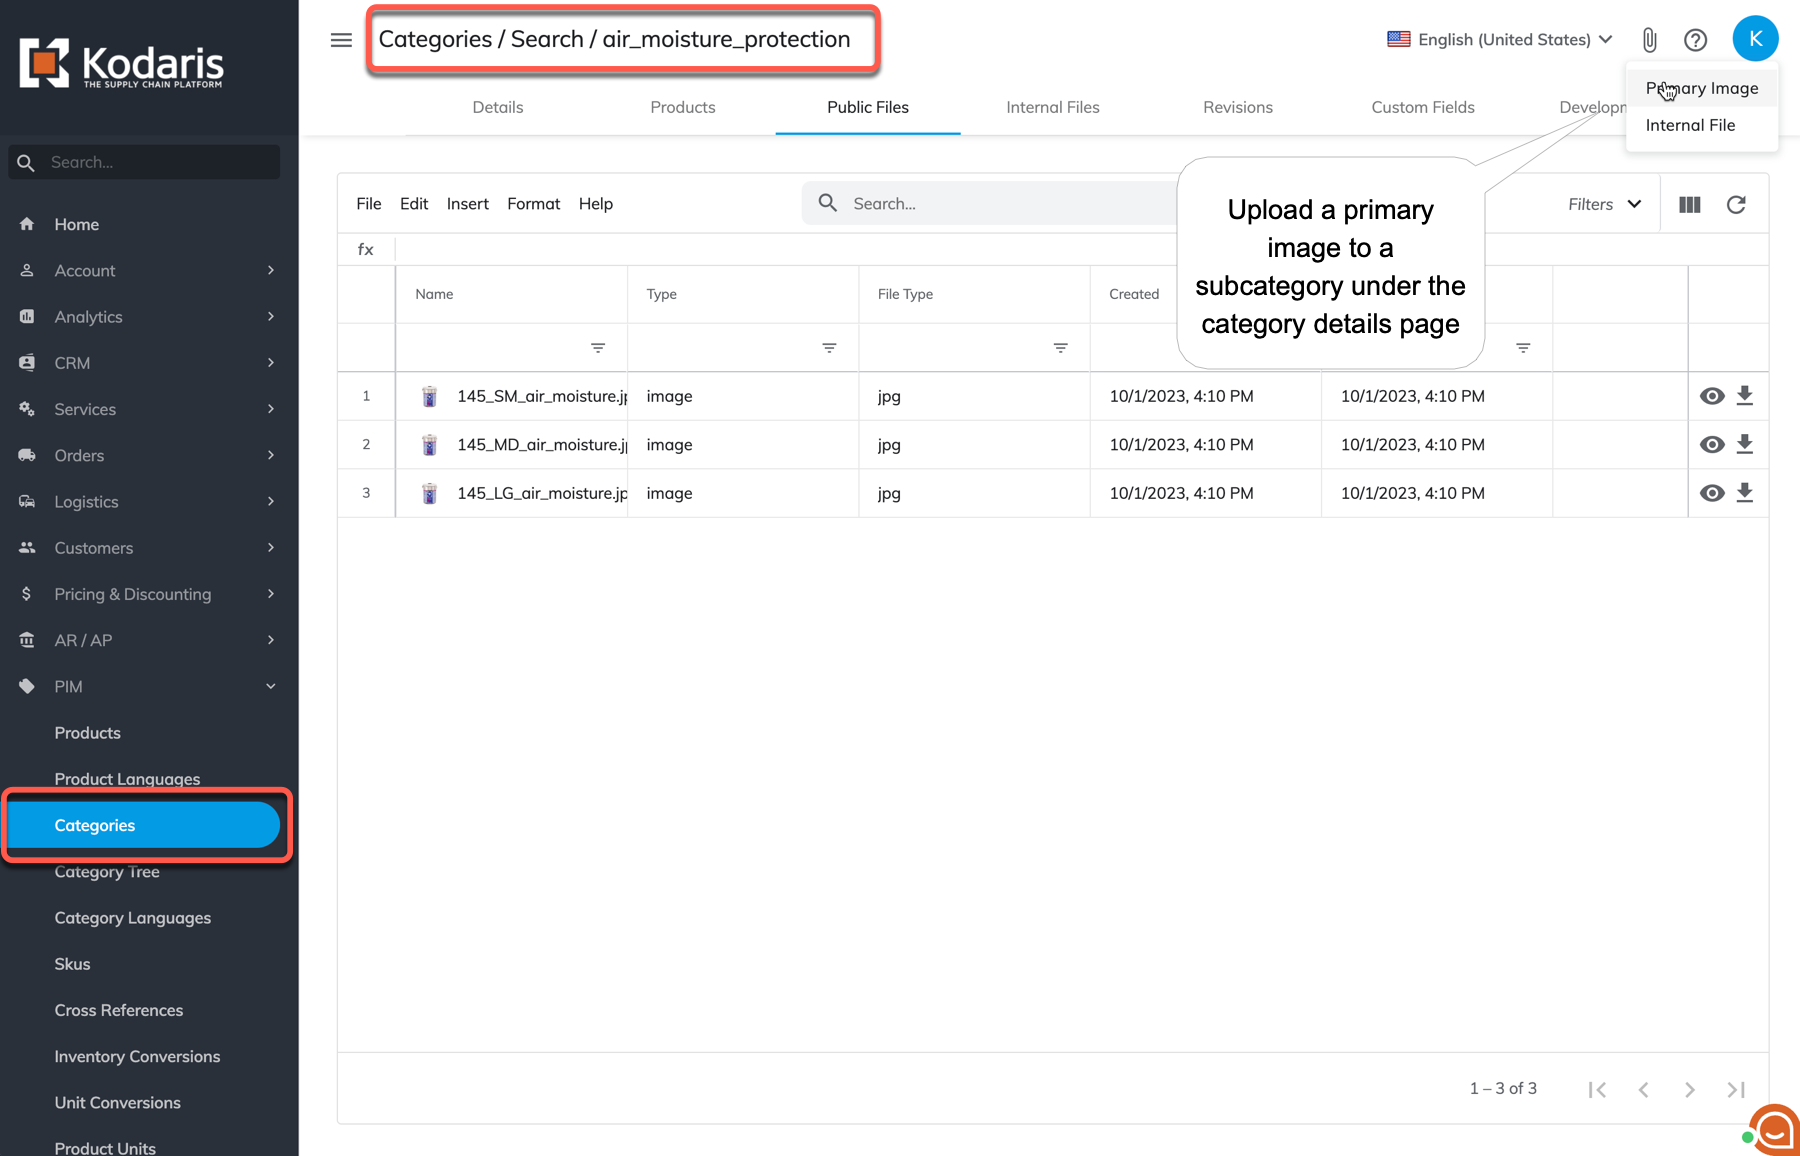
Please note that for this slider to display, there needs to be at least six subcategories under the parent category, and a primary image needs to be uploaded for each subcategory. To upload a primary image, navigate to the PIM section of the Operations Portal, select Categories, and find the subcategory you would like to add an image to. Click the Details option to view more information, and from the following screen, use the paper-clip icon in the upper righthand corner to upload a Primary Image. Select the image to upload from your computer to add to the subcategory.
To configure the slider, navigate to your commerce site, then go to the category page you would like to add the slider to. On that page, go to the Manage Category widget in the upper right corner; under the Subcategory Slider section, select "yes" in the Display? field, then enter the title that will appear above the slider.
Please reach out to your Kodaris Account Manager if you would like to add this feature to your site.
Display recommended products
Your Kodaris platform includes a robust Product Inventory Management (PIM) module that can be used standalone or to power your Kodaris commerce or other commerce site. As an enhancement to how your customers shop on your website, you can now choose to recommend products to your customers via a slider on your home page. This feature allows you to not only display recommended products, but also customize and update them based on new products, etc.
If you would like this feature added to your site, please reach out to your Kodaris account manager.
Allow customers to save and search by their own product codes
In this release, your Kodaris commerce website now allows your customers to set their own product codes on products which improves their online shopping experience. If a customer has their own product codes that they use and are familiar with, they can enter these codes as a reference to easily find and view the products they are looking for.
To allow your customers to take advantage of this feature, they will simply need to log into their account, go to the product page they would like to add an alternative code to and click on the Add line next to Your Part #. After they input the alternative code into the dropdown, they will click save and voila! their code or reference name will now be saved for future use.
Tickets
KOD-13310: Add Roles to Customers Via Import
Regression Tests
Case 1:
Perform export
Case 2:
Check performing an import operation that it does Create, Create & Update, and Update if the CSV file doesn't have the roles column
Case 3:
Check importing file with roles column
Create & Update
Update
Create
KOD-13959: Update Trip Service
Regression Tests
Case 1: After moved tripList and tripSettingList to separate tripSearchService, need to check on product regression the current pages on UI
Go to *trip list* page, add few items to list, check sort and search column
Select some trip, go to tab: *customFields,* add few settings to customFields list, check sort and search column
Then go to logs page, check the results from endpoints({color:#ff5630}
KOD-14671: QBO Integration - Payment Status
KOD-15279: Redirect Required for Adobe Cart Screen
Regression Tests
Case 1:
Login to Customer Portal
Make sure global setting {{customerReorderRedirect}} is empty
Go to Orders ? Order
Click *Reorder* button
Make sure you’re redirected to {{'/spcu/cart'}} page
Tests
Case 1:
Login to Customer Portal
Make sure global setting {{customerReorderRedirect}} has URL value
Go to Orders ? Order
Click *Reorder* button
Make sure you’re redirected to the setup URL
KOD-15445: Add New Screens/Tabs for Trips and Deliveries to Operations Portal
Case 1:
Log into Operations Portal
Go to Logistics ? Trips
Choose any trip
You should be redirected to Details page of chosen trip
Try to edit information on Details page, new changes should be shown
You should see new tab “Deliveries”
Case 2:
Log into Operations Portal
Go to Logistics ? Trips
Choose any trip
You should be redirected to Details page of chosen trip
Go to new tab “Deliveries”
You should see list of all deliveries
Case 3:
Log into Operations Portal
Go to Logistics ? Trips
Choose any trip
You should be redirected to Details page of chosen trip
Go to new tab “Deliveries”
You should see list of all deliveries
Choose one of existing deliveries
You should be redirected to Details page of chosen delivery
Case 4:
Log into Operations Portal
Go to Orders ? Order Shipments
Choose any of existing order shipments
You should be redirected to details page
You should see new tabs: Details, Order Shipments Items, Custom Fields and Development
Case 5:
Log into Operations Portal
Go to Orders ? Order Shipments
Choose any of existing order shipments
You should be redirected to Details page
Try to edit some fields on Details page
Case 6:
Log into Operations Portal
Go to Orders ? Order Shipments
Choose any of existing order shipments
You should be redirected to Details page
Go to “Order Shipments Items” tab
You should see list of all items
Case 7:
Log into Operations Portal
Go to Orders ? Order Shipments
Choose any of existing order shipments
You should be redirected to Details page
Go to “Custom Fields” tab
You should see a list with all custom fields
Try to add, edit or delete custom fields
Case 8:
Log into Operations Portal
Go to Orders ? Order Shipments
Choose any of existing order shipments
You should be redirected to Details page
Go to “Development” tab
Case 9:
Log into Operations Portal
Go to Logistics ? Deliveries
Choose any of existing deliveries
You should be redirected to Details page
You should see two new tabs: Order Shipments and Development
Case 10:
Log into Operations Portal
Go to Logistics ? Deliveries
Choose any of existing deliveries
You should be redirected to Details page
Go to “Order Shipments” tab
You should see list of all order shipments
Select one of existing order shipments
You should navigate to Details page of chosen order shipments
Case 11:
Log into Operations Portal
Go to Logistics ? Deliveries
Choose any of existing deliveries
You should be redirected to Details page
Go to “Development” tab
KOD-15537: Update Endpoint Mobile Uses for Form Processing
Tests
Case 1:
Open app
Press ‘Request Account’ text
Enter fields
Press 'Request Account' button
Dialog should be shown with successful message (for example word ‘Sent!’, etc.)
Case 2:
Open app in other flavors
KOD-15941: Issue Importing File - Organization Field Too Large
Regression Tests
Case 1:
Go to Jobs
Import File > Import > Dodge
KOD-16005: Put in the Adobe API Call for Reordering
KOD-16024: Parser Code Question
KOD-16029: Hide Price and Add to Cart for New "isRestricted" Products
Regression Tests
Case 1:
Login as a customer.
Search some product with canPurchase = true and it has a price.
On a search page:
Make sure you don’t see “This item is restricted on your account. Please contact your sales rep for more information” message.
Make sure “Add to cart“ button is visible.
Make sure you see this price.
Go to product page.
On a product page:
Make sure you don’t see “This item is restricted on your account. Please contact your sales rep for more information” message.
Make sure “Add to cart“ button is visible.
Make sure you see this price.
Case 2:
Login as a customer.
Search some product with canPurchase = true and it has no price.
On a search page:
Make sure you don’t see “This item is restricted on your account. Please contact your sales rep for more information” message.
Make sure “Add to cart“ button is visible.
Make sure you don't see *TBD* label.
Go to product page.
On a product page:
Make sure you don’t see “This item is restricted on your account. Please contact your sales rep for more information” message.
Make sure “Add to cart“ button is visible.
Make sure you don't see *TBD* label.
Case 3:
Login as a customer
Search some product with canPurchase = false.
On a search page:
Make sure you don’t see “This item is restricted on your account. Please contact your sales rep for more information” message.
Make sure “Add to cart“ button is not visible.
Make sure you see this price or *TBD* label.
Go to product page.
On a product page:
Make sure you don’t see “This item is restricted on your account. Please contact your sales rep for more information” message.
Make sure “Add to cart“ button is not visible.
Make sure you see price or *TBD* label.
Tests
Case 1:
Login as a customer.
Search some product with canPurchase = false.
On a search page:
Make sure you can see “This item is restricted on your account. Please contact your sales rep for more information” message.
Make sure “Add to cart“ button is hidden.
If this product has a price, make sure you see this price.
Go to product page.
On a product page:
Make sure you can see “This item is restricted on your account. Please contact your sales rep for more information” message.
Make sure “Add to cart“ button is hidden.
If this product has a price, make sure you see this price.
Case 2:
Login as a customer
Search some product with canPurchase = false.
On a search page:
Make sure you can see “This item is restricted on your account. Please contact your sales rep for more information” message.
Make sure “Add to cart“ button is hidden.
If this product doesn’t have a price, make sure you don’t see *TBD*.
Go to product page.
On a product page:
Make sure you can see “This item is restricted on your account. Please contact your sales rep for more information” message.
Make sure “Add to cart“ button is hidden.
If this product doesn’t have a price, make sure you don’t see *TBD*.
KOD-16054: Invoice Update for Price Per and Unit Price Fields
Tests
Case 1:
Login to Operations Portal and select a sample order.
Generate an order email and an order PDF and check that the order item table shows the Price Per and Price fields.
Login to Customer Portal and select a sample order with ship via data. Check the order layout and that the order item table shows the Price Per and Price fields.
Please check new orders so that the fields are populated correctly.
KOD-16122: Mass Importing Product Images to Match Product Names
KOD-16126: Need the PO and PO Lines
KOD-16143: Configure Multi-lingual
Tests
Case 1:
Test Page translations
Go to Operations Portal > CMS > Pages
Click Edit page on the page you want to translate
In the Gutenberg editor, click on the translation/language button in the nav bar
Choose the language you want to translate to; the page will refresh
Update the page with the translated content
Click Save
Preview the page
Choose the language from the website’s language button
Check that the translated page shows correctly
Case 2:
Test Menu translations
Go to Operations Portal > CMS > Menus; the editor will open in a new tab
Choose the language you want to translate to using the language dropdown in the upper left side of the screen; the page will refresh
Go to Menus and select the menu you want to translate
Update/translate the links into the chosen language
Click Activate and Publish; the screen will refresh
Choose the language from the website’s language button
Check that the menu translations are showing correctly
Case 3:
Test Website translations
Login to the Operations Portal
Go back to the site and check that the translate button is showing in the top nav bar
Click on the translate button; it will turn to “translating” and the text that can be translated will have red dotted underlines
From the language dropdown, choose the language you want to translate to
Do a ctrl + click on the text with the red dotted underline you want to translate; the translation popup will show up and you should be able to put in your translation in the field
Click OK to save your changes
To stop translating click on the translate button again
Check that translations are showing properly when you chose the languages in the site
Also test the translate on other pages such as login, register page
Case 4:
Test Customer Portal translations
Go to the Operations Portal > Languages > Messages
In the Messages table, add the translations you want to add in the Customer Portal.
Type in the language of the translation you want to add, the code would be the text you want to translate, and the message is the translation of the text, select Customer Portal for the type
Login to the Customer Portal and check if the translations are showing correctly
KOD-16155: Make Description on Tickets in Kodaris Go Full Screen
Tests
Case 1:
Login to the Operations Portal.
Go to the Tickets page and click on a sample ticket.
In the description editor, click on the … icon. Look for the fullscreen icon and click on it. The editor should go full screen. Click on the fullscreen icon again to close the full screen.
Also check the full screen mode when the sidebar of the Portal is closed.
First close the sidebar. Then In the description editor, click on the … icon. Look for the fullscreen icon and click on it. The editor should go full screen. Click on the fullscreen icon again to close the full screen.
KOD-16263: Convert Purchase Order to Vendor Invoice
New Endpoint:
POST {{/api/system/vendorInvoice/purchaseOrder/{purchaseOrderID}/copy}}
KOD-16324: Rename Vendor User VendorUsers
Endpoint GET {{/api/system/vendorUser/{vendorUserID}/profileImage}} was removed from the system side as there is no such field, and corresponding endpoint does not exist in Customer API.
Regression Tests
Case 1:
Re-testing {{/api/vendor/user}} API ({{Vendor}} spec in swagger) after changes
Case 2:
Re-testing system side after changes
KOD-16333: Add UX for Uploading Images to Internal/Intranet Content Pages
Tests
Case 1:
Login to Operations Portal ? Intranet ? Pages ? click edit page ? try to upload some image ? image must be correctly displayed
Case 2:
In the Gutenberg editor ? Check sidebar ? Featured image section ? try to upload new featured image ? image must be correctly displayed ? click save ? and check page details in Operations Portal ? medium Image field should have value
KOD-16375: Customer App - When There Is No Orders, a Blank Screen Is Displayed
Tests
Case 1:
Log into customer app
Click on “My orders” button
On initial loading of orders the text {{No orders available}} should not be shown
Case 2:
Log into customer app
Click on “My orders” button
If no orders shown, then text {{No orders available}} has to be displayed at center of screen
If orders exist in step 3, then make search request, that won't include in any orders
Case 3:
Log into customer app
Click on “My orders” button
Orders should be loaded
Make search request for the text {{No orders available}} to be shown
Clear search field
While loading back to the list of orders in step 3, text {{No orders available}} should not be shown
Case 4:
Log into customer app
Click on “My orders” button
Enter search text; wait for orders or {{No orders available}} to be shown
Enter space to search request (to the end of request); loading should not begin
Case 5:
Log into customer app
Click on “My orders” button
Enter search text with spaces in it; search should not fail
Case 6:
Test Case 1-5 in “three dots on main screen” ? locations
Case 7:
Test Case 1-5 in “three dots on main screen” ? locations ? open any location ? scroll down to bottom ? add user
Case 8:
Test Case 1-5 in “three dots on main screen” ? quote
Case 9:
Test Case 1-5 in “three dots on main screen” ? employees
KOD-16446: VendorInvoice and PurchaseOrder Has to be Completed After Creation
Tests
Case 1:
Check VendorInvoice
Check 2:
Check PurchaseOrder
KOD-16449: Remove _1 on Lockbox Files in Base Interceptor
Regression Tests
Case 1:
Test generating a Lockbox file with a customerNumber that does not have a _1 and ensure that nothing is stripped off
Tests
Case 1:
Test generating a Lockbox file with a customerNumber that has a _1 at the end and ensure it is stripped off
KOD-16451: Address Line Mapping Issues
KOD-16455: Catalog Page View - Add Field to FacetGroup boolean productDisplay
Regression Tests
Test filtering and sorting on category pages and viewing product pages. Logged in and as public user.
Case 1:
In Operations Portal, go to filter categories page, select some facet group, get id of record
Go on Swagger side, find endpoint: PATCH: [/api/system/productFacet/{productFacetID}, updated new field: *productDisplay* set value: true or false
Search current facet group (in which updated the field: *productDisplay*) on UI side and via terminal check whether the new field is returned and updated
Case 2: check whether sorting for columns works well on page
Case 3: check whether sorting and filtering works well on customer page
KOD-16456: Making All script Editors in the Portal Save if You Do cmd+s
Regression Tests
Case 1:
Go to Marketing ? Templates page, then go to one of templates, add some new content to script and press cmd+s to save it.
Then refresh the page and see if changes are saved.
Also go to Development ? Scripts, API Scripts, User Scripts and Interceptors and check this feature there
KOD-16458: Journals - Account Payment Methods Field
Regression Tests
Case 1:
Go to Operations Portal
Go to System ? Journals
Check if journals screen looks good
Case 2:
Go to Operations Portal
Go to System ? Journals
Go to Details page
Check if Details page looks good
Tests
Case 1:
Go to Operations Portal
Log into Operations Portal
Go to System ? Journals
Go to Details page
Check if there no field call ‘Account Payment Methods’
KOD-16460: Part 3 - Tax at Checkout Issue
KOD-16462: Add hostCode to sscCMS
KOD-6291: Infor CSD Purchase Order Item Import (POEL)
KOD-6290: Infor CSD Purchase Order Import (POEH)
KOD-16476: CDV2 Pricing - Respect Different ARSPT Matrixes
KOD-16480: Add onOrder Flag to SKUs in /pricesByCodes
KOD-16482: Convert the CMYK Images to RGB
KOD-16487: Add customerReorderRedirect Setting
KOD-16498: Shipped Date in Order Is Not Pulling Any Data
KOD-16497: GET ORDER UPDATE to Fix Nonstock Issue
Regression Tests
Case 1:
Check if Magento order creation flow works
KOD-16615: Remove 'Add'l Charges' and Freight Text in Order Layouts