In the PIM section of the Kodaris platform, you can view all of the Filter Categories you have created to display products on your commerce site in specific grouping. In this release, we've enhanced how you can look for Filter Categories; you can now sort by ascending or descending order using either the Code or Position columns. This is particularly helpful so that you can either view your Codes in alphabetical order or sort to see the order Filter Categories appear in on your commerce site.
Update content pages through exporting and importing
Your Kodaris platform includes a powerful CMS (Content Management System) for creating and managing informational pages on your commerce site. With this latest release, you can now create and bulk update content pages, which is especially helpful if you need to add multiple content pages to your website at once, using the export and import options.
To export, navigate to the CMS section of the Operations Portal, then select the Pages > Data tab. Using the Show/Hide Columns icon, select the fields you would like to export, such as Content, Title, or Parent Page. Be sure to include the Code field so your import information can be matched. Then go to File > Export to download a .CSV file of your exported information.
Update the .CSV file to update content information or to create new pages and their information. To import, navigate again to the CMS section of the Operations Portal, then select File > Import. Choose your preferred importing options from the dropdown menu, select the .CSV file you would like to import, and voila!
View and select quantity conversions for order, quote, and cash quote items
As an employee, you are now able to view and select quantity conversions on orders, quotes and cash quotes.
This is an advanced feature Kodaris has created as a third unit conversion for when there is a need for users to enter a bulk number such as footage or quantity and have the quantity entered convert to the closest Order Unit and rounded up.
Example: 1000 X .04 = 40 then round to 50 and quantity = 2
You can then use your standard Pricing and Unit Conversions allowing for a total of three conversions per line item.
To use this feature, simply go to the quote, order or cash quote you would like to choose a quantity conversion for, select the Qty Conv option from the column dropdown, and choose your preferred value.
This feature requires quantity conversion factors to be configured. Please reach out to your account manager if you’d like to learn how to set these up. Help pages coming soon.
Commerce
View products added to cart while shopping
The Kodaris commerce platform offers an easy, intuitive shopping experience for your customers. To enhance their ordering experience, you can now add the visibility to what's already "in cart" to your commerce website. This new feature displays a shopping cart icon on any product that's already "in cart" along with the quantity, allowing your customers to see what they have already selected for purchase without having to navigate to the cart itself.
If you would like add this feature to your commerce website, please contact your Kodaris Account Manager to discuss updating your website template
Payment
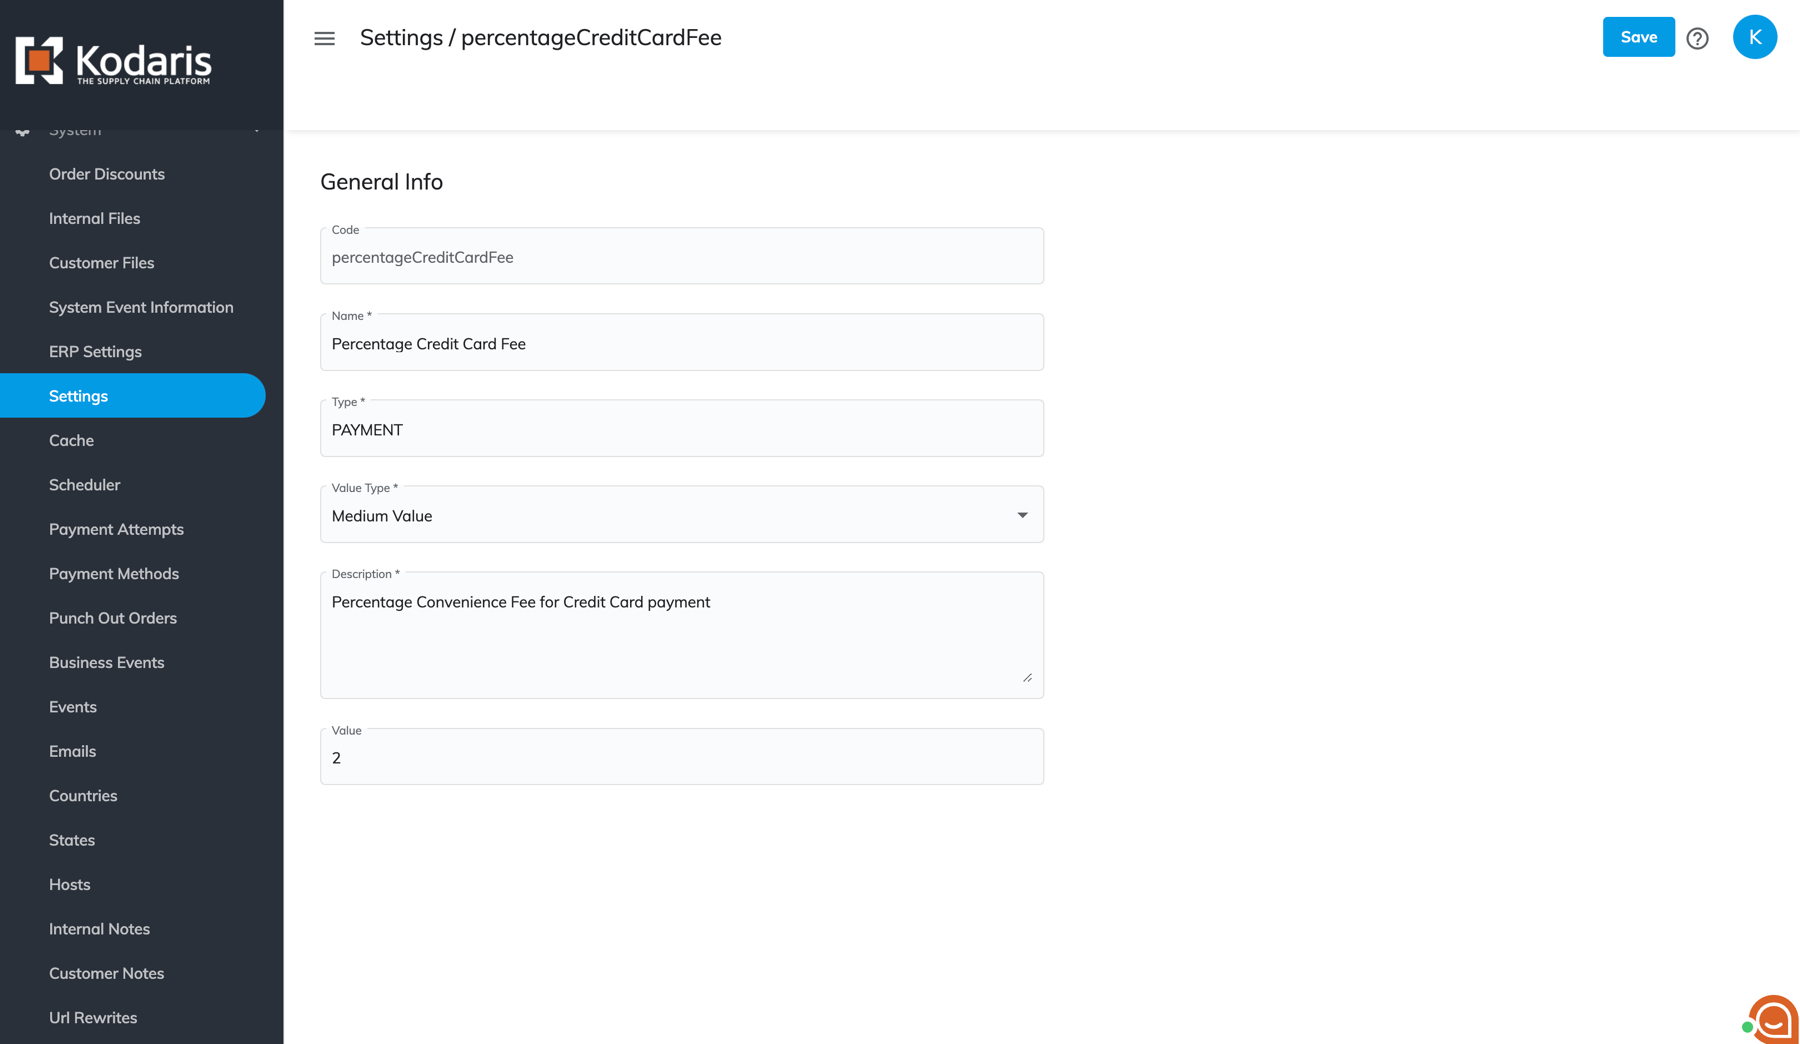
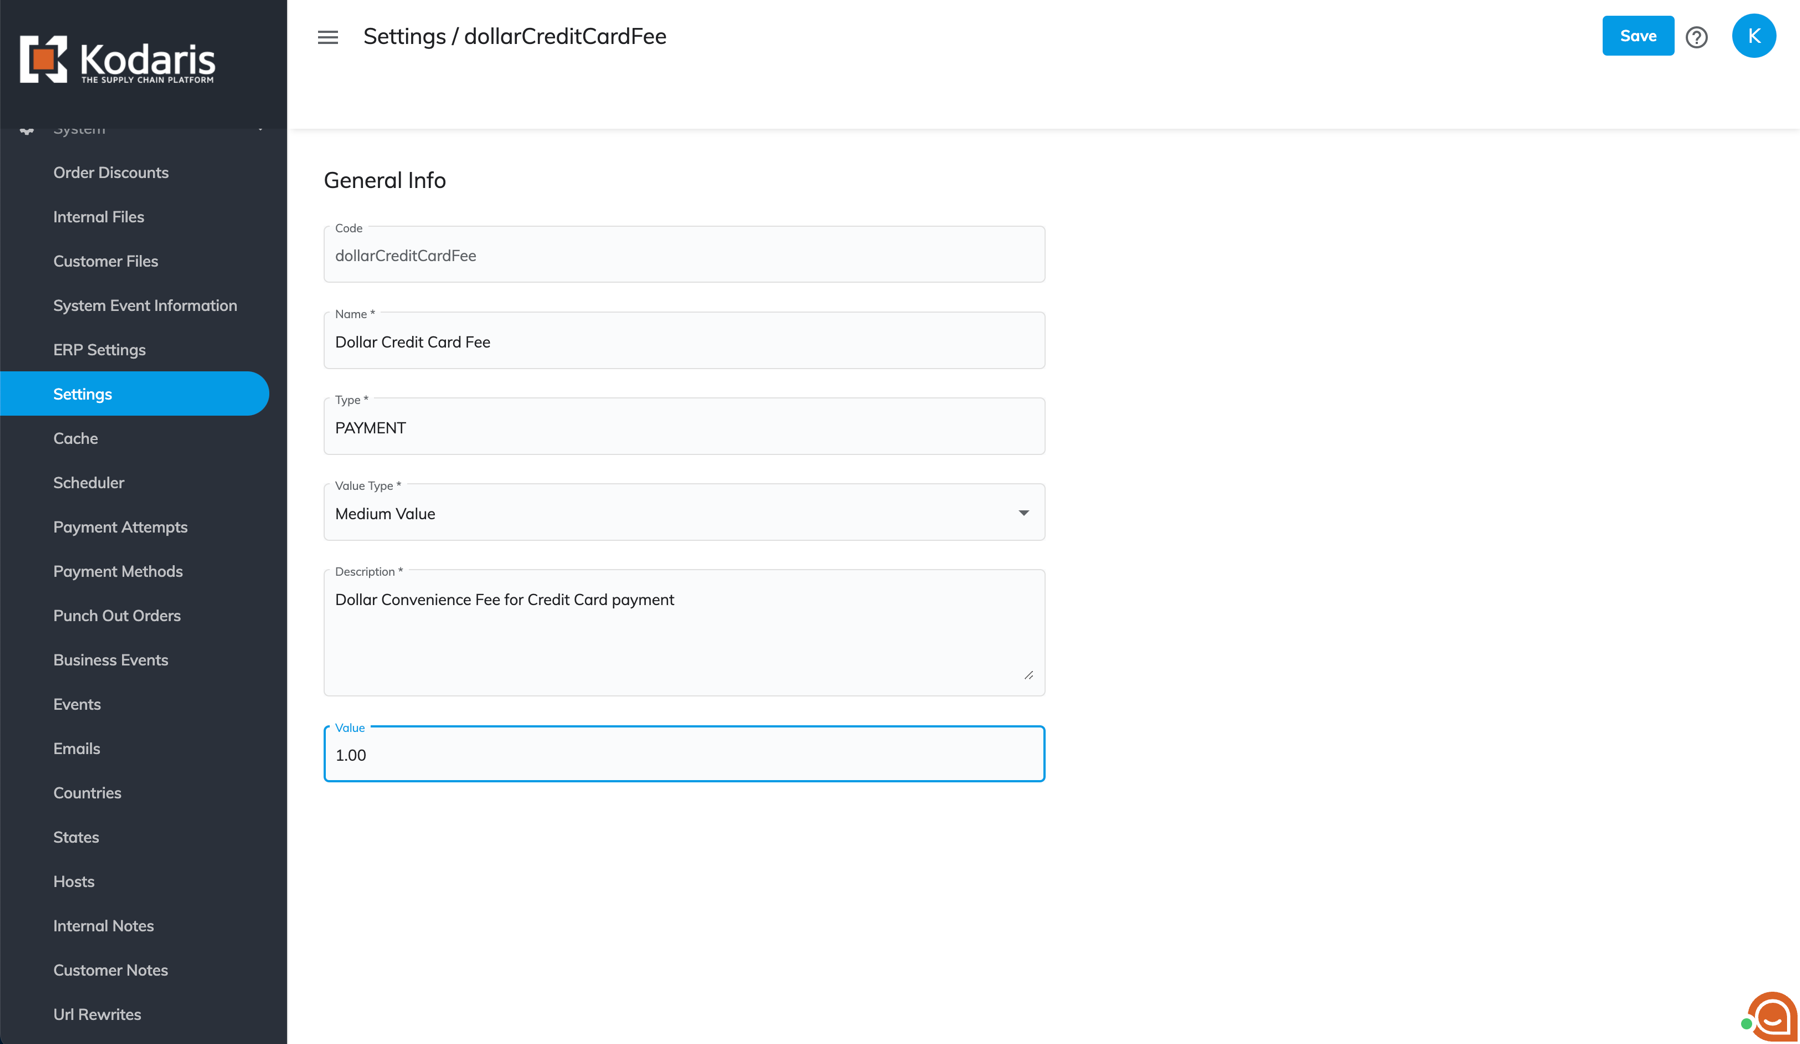
Add convenience fees to credit card payments
Your Kodaris platform includes the ability for your customers to pay open invoices online via either ACH or credit card. As part of this release, you now can charge a convenience fee for those who opt to use a credit card. Depending on your preference, you can set the convenience fee to a specific dollar amount or percentage amount of the payment being made.
To enable this feature, navigate to the System section of your Operations Portal and select the Settings section. Depending on the fee type you would like to add, search for either percentageCreditCardFee to add a percentage or dollarCreditCardFee to add a specific dollar amount. After select the setting, simply input the desired value and click Save. Your fee is now enabled, and your customers will see the convenience fee amount appear if they select to use a credit card.
Tickets
KOD-14604: Include Credit Team Email When a Customer Gets an Payment Error
Go to COD payment form.
New error message is “Something went wrong, please try again or contact us at {{arEmailAddress}}.” If {{arEmailAddress}} setting is not set up, email should fallback to {{storeEmailAddress}}.
KOD-15237: Unable to Edit Activity with Limited Permissions
Regression Tests
Preconditions:
Login to Employee Portal as a user with only ticketEdit, ticketView, companyEdit and companyView
Case 1:
Go to CRM -> Activities -> Activity Details
Edit any information for the activity
Reload page
Make sure all updated information is presenting
Case 2:
Go to CRM -> Activities -> Activity Details
Click on “+Add assignee“ autocomplete
Make sure autocomplete works as expected
Reload page
Make sure assignee added properly
Case 3:
Go to CRM -> Activities -> Activity Details
Click on "Remove Assignee" button
Reload page
Make sure assignee removed properly
Tests
Preconditions:
Login to Employee Portal as a user with only companyEdit and companyView permission
Case 1:
Go to CMS -> Companies -> Company Details -> Activities tab -> Activity Details
Edit any information for the activity
Reload Page
Make sure all updated information is presenting
Case 2:
Go to CMS -> Companies -> Company Details -> Activities tab -> Activity Details
Click on “+Add assignee“ autocomplete
Make sure autocomplete works as expected
Reload page
Make sure assignee added properly
Case 3:
Go to CMS -> Companies -> Company Details -> Activities tab -> Activity Details
Click on "Remove Assignee" button
Reload page
Make sure assignee removed properly
KOD-15253: Employee App Stuck on Login
KOD-15372: Insert - Rows from Clipboard Not Working in Operations Portal
Regression Tests
Case 1:
Please check assigning roles to an employee using the normal flow
Case 1:
Please go to the Employee Group Roles screen and try to add several rows from clipboard
Please go to the Employees -> Employee -> Roles screen and try to add several rows from clipboard
KOD-15478: Add UX for Import/Export for Content Pages
Login to Operations Portal
Go to CMS -> Pages -> Data
Go to File -> Import -> 3 import items should be present
mapping-basicContentPageUpload - Create & Update
mapping-basicContentPageUploadUpdateOnly - Update only
mapping-basicContentPageUploadCreateOnly - Create Only
Go to File -> Export, click on it, .CSV file should be exported
KOD-15570: Port New Credit App
As a guest user:
Navigate to “/spcu/credit-application-register”; here you should enter your email address to sign up for credit
You should receive an email with a link to reset your password
Reset your password following the link
Login as prompted
After login you should automatically be redirected to the credit application form
Fill out the credit application; if you leave and come back later, the data that you entered should pre-fill the form
Once you are ready to submit the form, click complete
Regression tests:
Test logging in on both the header and the login page; make sure it works fine and you should not be redirected to credit app
KOD-15571: Add "In cart" Indicator to Site
Regression Tests
Case 1:
Open site
Click on Ceilings
Click on "Grid View" Button
Choose a cart and click "Add to Cart" button
Check that icon with the appropriate quantity was added at the right corner of the tile
Reload the page
Check that icon with the appropriate quantity was added at the right corner of the tile
Case 2:
Open site
Click on Ceilings
Click on "List View" Button
Choose a cart and click "Add to Cart" button
Check that icon with the appropriate quantity was added to the tile
Reload the page
Check that icon with the appropriate quantity was displayed in the tile
Case 3:
For the category and search pages:
Make sure that pricing still shows fine
Ensure that items that do not fall under contractual pricing do not show the cart, list, and quantity buttons
Ensure that adding to the cart works fine for both list and grid view
Test as a logged out user; make sure the pages still look and behave as normal
Tests
Case 1:
Open site
Click on Ceilings
Click on "Grid View" Button
Choose a cart and click "Add to Cart" button
Check that icon with the appropriate quantity was added at the right corner of the tile
Case 2
Open site
Click on Ceilings
Click on "List View" Button
Choose a cart and click "Add to Cart" button
Check that icon with the appropriate quantity was added to the tile
KOD-15575: Can't Set System or Company Views for Customer Portal
KOD-15659: Update Display Value on Qty Conv on Orders & Quotes
Regression Tests
Case 1:
Go to Orders -> Orders -> Order Details -> Items tab
Make sure table layout is not broken
Make sure table properties are displayed as expected
Test changing the qty conv
Case 2:
Go to CRM -> Quotes -> Quote Details -> Items tab
Make sure table layout is not broken
Make sure table properties are displayed as expected
Test changing the qty conv
Case 3:
General order/quote entry such as adding items, editing items, sorting, filtering….
Tests
Case 1:
Go to PIM -> Orders -> Order Details -> Items tab
Click "Show/Hide Columns" icon
Make {{Qty Conv}} field visible
Make sure values for {{Qty Conv}} are displayed as expected
Test changing the qty conv
Case 2:
Go to CRM -> Quotes -> Quote Details -> Items tab
Click "Show/Hide Columns" icon
Make {{Qty Conv}} field visible
Make sure values for {{Qty Conv}} are displayed as expected
Test changing the qty conv
KOD-15663: Update Line Numbers on Invoices
Tests
Case 1:
Login to the Employee Portal and go to Orders
Choose a test order that has order items
Generate an order email, check the line number of the email if it is the same as the line numbers in the order items
Generate an order PDF, check the line numbers of the PDF if it is the same as the line numbers in the order items
Go to the customer portal; click on a sample order and check if the line numbers of the order matches the line numbers in the order items
KOD-15727: Image Issue when Updating Top Category with Limited Permissions
Select or create employee with one role: *contentEdit*
then go to endpoint: /{categoryID}/saveFile, try to upload category
KOD-15730: Cannot Remove the Banner Link After Setting It
Case 1:
Log in Employee Portal
Go to front part of site
Choose any categories
Click manage categories on category page
Add link in banner section
Set yes in display option in subcategory slider
Click "Save" button
Click manage categories on category page
Remove link in banner section
Click "Save" button
Click manage categories on category page
Check if there is no link in banner section in manage categories on category page
KOD-15756: Support API Call for New "Copy Ticket" Button Function
Create a ticket or use an existing one
Call {{/api/system/ticket/{ticketID}/clone}} with different request body:
body:
{
"code": null,
"title": "This title differs from the original one"
}
body:
{
"code": null,
"title": null
}
body:
{
"code": "KOD-1337",
"title": "custom title to cloned ticket"
}
body:
{
"code": "KOD-4308",
"title": null
}
KOD-15769: Page Layouts - When Adding a Row the Code and Name Is Renamed
Go to Page Layouts screen
Go to Data tab
Add new record
Make sure that your code and name isn’t renamed
Regression:
Go to Page Layouts screen
Click on "Add Layout"
Select template
Check if URL slug has random generated code and name "Untitled"
KOD-15790: Cancel Scheduled Payment API
Test new DELETE endpoint {{/api/account/payment/scheduledPayment/{paymentID}}}
Before testing you can create scheduled payment with already implemented
{{/api/account/paymentProcessing/search/schedulePayment}} and get response with paymentID as result
Also all payments found are linked to this new payment through {{webPaymentID}}
With {{/api/system/payment/{paymentID} }} you can check each payment separately to see that they have {{webPaymentID}} with new paymentID value of scheduled payment
Use new paymentID to cancel payment you scheduled with {{/api/account/payment/scheduledPayment/{paymentID}}}
As result all linked invoices (payments) are unlinked (use {{/api/system/payment/{paymentID} }} and confirm that payments has {{webPaymentID}} - null and status “Open”
Also scheduled payment should be inactive (in result of {{/api/account/payment/scheduledPayment/{paymentID}}} you will see payment response, check if ”active” - false in response
Details:
If you try to use any random paymentID that is not scheduled payment - should get an error
KOD-15811: Multilingual Issue with New Subcategory Slider
Case 1:
Log in Employee Portal
Go to front part of site
Choose any categories
Click manage categories on category page
Set yes in display option in subcategory slider
Add title
Click "Save" button
Change language
If it is new title, the translation doesn't appear; you can change this one using "Translate" button
Case 2:
Repeat case 1
Go to home page
Choose another category
Repeat case 1
Go to previous category
Slider’s title should appear as you set up
Regression:
Case 1:
Log in Employee Portal
Go to front part of site
You should see "Translate" button at the top
Click on "Translate" button, it should change to "Translating"
You should see that most of the text is underlined
Go to any categories
Add Subcategory Slider
Change title
Change language into French
Change title
Switch language
Title should be the same as in step 8
Case 2:
Find all the categories that have a subcategory slider setup
Make sure entire page is displays fine, including subcategory slider
Make sure adding product to cart works fine
KOD-15821: Customer Portal - Open Invoices - Remove Time from Invoice Date and Due Date Columns
Open Invoices and check if date has 12/31/30 (mm/dd/yy) format
Case 1:
Open Invoices: please check if filtering for invoice date and due date works correctly
Case 2:
Orders: please check if filtering for created works correctly
KOD-15871: Rules and Actions in the Employee Portal Related to Approval Workflows and Actions
Tests
Case 1:
Search for System -> Customer Rules Tab in left navigation
For creating, fill in all the required fields, including valid customerID
Case 2:
Open Details of any created record
In Details Tab, you’ll see all the Rule Data; test editing the data here
Case 3
Near Details Tab will be Actions Tab; open Actions Tab
On Actions Tab, you’ll see all the actions related to the Customer Rule
Try creating, editing, deleting the action
KOD-15914: Order/Invoice Document Updates
KOD-15916: Add New Category Banner Feature
Case 1:
Please pick different categories and check if categories without banner display fine, for both public users and logged in customers
Case 2:
Please check if there is no issue with header disappearing when user is logged in
Tests
Case 1:
Please pick a category and check if there is a banner
Case 2:
Go to Operations Portal and log in
After reloading the customer site, you should see button "Manage Category"
Try to add and remove banner
KOD-15932: UX - Add Convenience Fee to Account Payments
Tests
Case 1:
Make sure that global setting {{openInvoicePaymentsEnabled}} is turned ON
{{percentageCreditCardFee}} set 0 value
Login as a customer
Click Open Invoices
Choose the invoice
Click Make Payment
Click Pay selected invoices
Check that invoices dialog is opened
Check that convenience fee is not displayed under each card payment method
Choose any payment method
Click Make Payment
Make sure that the payments process behaves normally, and you received a successful payment message
Make sure you receive both the customer and employee payment made emails
Check that emails have a row with correct convenience fee
Case 2:
Make sure that global settings {{openInvoicePaymentsEnabled}}, is turned ON
{percentageCreditCardFee}} has some value
Login as a customer
Click Open Invoices
Choose the invoice
Click Make Payment
Click Pay selected invoices
Check that invoices dialog is opened
Check that convenience fee is displayed under each card payment method
Click Make Payment
Make sure that the payments process behaves normally, and you receive a successful payment message
Make sure you receive both the customer and employee payment made emails
Check that emails don't include convenience fee row
Case 3:
Make sure that global settings openInvoicePaymentsEnabled is turned ON
percentageCreditCardFee has some value
Login as a customer
Click Open Invoices
Choose the invoice
Click Make Payment
Click Pay selected invoices
Check that invoices dialog is opened
Click Add payment method
Choose *Credit card method*
Fill all fields such as: Card number, Card Name, Expiry Date, CVV, Billing Street, Billing Zip Code
Click Add button
Check that Convenience fee is displayed near just added payment method
Case 4:
Make sure that global settings openInvoicePaymentsEnabled is turned ON
percentageCreditCardFee has some value
Login as a customer
Click Open Invoices
Choose the invoice
Click Make Payment
Click Pay selected invoices
Check that invoices dialog is opened
Click Add payment method
Choose *ACH account method*
Fill all field such as: Account Name, Account Type, Bank Name, Routing Number, Account Number, Signature
Click Add button
Check that Convenience fee is not displayed in just added payment method
KOD-15933: Add a Template for ticketAssignedToEmployeeNotification-EMAIL
Tests
Case 1:
Please check that the email layout is correct and contains title "Creator" instead of "Assignee".
How to add yourself as a subscriber and receive email:
Open Tickets
Choose Ticket
Add your emails to assignees
Check your email
Make sure if you click on the ticket number - you will be redirected to the Ticket Details page
KOD-15944: Calculation for Option Items
KOD-15949: hostCode Needed on ERP Settings
Make sure ERP setting grid loads fine in Employee Portal
KOD-15953: Remove Link Setting
KOD-15963: Filter Categories - Sort by Code and Position
Go to Filter Categories and categories can be sorted by columns "position" and "code"
KOD-15964: Add a Method to Set User Session Variable
KOD-15969: Add hostCode and cono to UnitConversions
Test that the unit conversions screen in the Employee Portal still loads fine
Use Unit Conversion API for testing:
1) POST {{/api/system/unitConversion}}
You can add hostCode (String) and cono (Integer) fields now
Make sure you see those fields in response for this request
2) GET {{/api/system/unitConversion/{unitConversionID}}}
Try to get Unit Conversion by ID and make sure new fields in the response
3) PUT /api/system/unitConversion/{unitConversionID}
Try to update one of Unit Conversion that already exists, update hostCode and cono values
Make sure fields updated
KOD-15981: Set Billable on Ticket Creation to true as default
Regression Tests
Case 1:
Make sure creating a ticket works
Tests
Case 1:
Create a ticket; go to the new ticket and check if the billable field is set to true
KOD-15983: Can't Rearrange Columns in Customer Portal
Regression Tests
Case 1:
Retest column dragging logic for embedded and non-embedded views
KOD-15985: Double Highlights on Active Fields in Embedded Portal
Regression Tests
Case 1:
Make sure that the dialog windows display correctly including grid filters and datepickers
Customer:
Click on your customer-> Switch company -> check if dialog displays correctly with correct styling
Orders:
Orders grid, check filter fields
Orders grid, check filter Date fields
Orders grid, check filters (grid view)
Open grid views, try to edit/add the view, check if dialog displays correctly with correct styling
Order -> Order Detail -> Add list button, the dialog for customer/company list, check if all display correctly
Employees:
Employees -> Add Employee -> check if dialog displays correctly with correct styling
Lists/Customer lists:
Lists -> Add List -> check if dialog displays correctly with correct styling
Lists -> List Details -> edit/delete list details -> check if dialog displays correctly with correct styling
Open invoices:
Open Invoices -> select invoices and go to make payment -> choose pay or schedule -> check if dialog displays correctly with correct styling
Payment Methods:
Go to Payment Methods -> try to edit/add the payment method -> check if dialog displays correctly with correct styling
Documents:
Go to Documents -> try to preview document -> check if document displays correctly with correct styling
Integrations:
Go to Integrations -> click request integration -> check if document displays correctly with correct styling
Profile
Go to Profile -> click Change Password -> check if document displays correctly with correct styling
Tests
Case 1:
Filter popup should be without double highlight
Case 2:
Creating a saved view dialog for grid should be without double highlight
Case 3:
Payment dialog fields should be without double highlight
Case 4:
Entering payment dialog should be without double highlight
Case 5:
Grid export dialog should be without double highlight
KOD-15988: Large Date Picker
Tests
Case 1:
Datepicker should be displayed correctly, without shifting inside container
KOD-15989: Tweaks to Order / Invoice Document Updates
Tests
Case 1:
Check Invoice date in Customer Portal Order detail screen; it should be showing if there is an invoice date for the order
Case 2:
If the order has a due date, it should be showing in the order screen, order email and order PDF
KOD-15995: Warehouse Not Populating for Customer Portal Invoices
Tests
Case 1:
Please go to the Open Invoices screen and check if the column warehouses is deleted
KOD-16001: UX to Remove Links
KOD-16004: Add City and State Fields to Company API
Regression Tests
Login as a customer
Check you are still able to see all allowed companies (logged user's company + all child companies of user's company) in the company select dropdown
Try to change your company to one from the list and check if it was successfully changed
Tests
Case 1:
Login as customer
Open "DevTools"/"Inspect Element" and navigate to "Network" tab
Activate company select dropdown and check if newly added fields (city, state) returned from endpoint: 'api/account/customer/myCompanies', even if they have no values
KOD-16008: Add Content Field to Content Page Export/Import Function
Tests
Case 1:
Content column should be present as available column for grid
Case 2:
Create/Update should update content field as well
Case 3:
Export should contain content field
KOD-16010: Unable to View Orders on Location with viewAssignedLocationOrders Role
KOD-16015: Add Ability to Save Generic Custom Records
KOD-16038: Remove paymentOnAccount Company Setting
Regression Tests
Case 1:
Make sure “paymentOnAccount” global setting is set to 0, and the deposit screen should not show up
Set "paymentOnAccount" global setting to one, and the deposit screen should show up
Also test making a deposit
Tests
Case 1:
Set “paymentOnAccount” to 1, and to restrict which companies can do deposits, turn on “enableCompanySpecificSettingForDeposit” to 1
The deposit screen shouldn’t show up
Case 2:
With both settings turned on, go to Companies -> your customer’s company -> Custom Fields and turn on the company setting “paymentOnAccount” (to turn on, change value to 1)
The deposit screen should show up for that company